- HP INC. is a leading information technology company known for manufacturing printers, desktops, laptops, and more.
- HP printers on a network allow multiple users to access the same printer without reconnecting, saving time.
- To fix HP Printer Not Showing Up on Network, troubleshoot by power cycling, uninstalling devices, performing factory resets, updating drivers, and connecting devices to the same network.
HP INC. is one of the well-known multinational information technology companies based in America that manufactures personal desktops, laptops, computer peripherals, printers, printer-related supplies, 3D printing solutions, and more. Talking about the HP Printers for both Home and Business are exceptionally good in terms of price-to-performance ratio. However, the HP Printer Not Showing Up on the Network on the computer is somehow frustrating.
A Network Printer can be any standard or AIO printer from HP, which can easily be accessible by the same network connection on the Windows desktop/laptop. So that other users can use the same printer, which will be connected to the same network. In that case, users in the same office or store or home desk won’t have to disconnect and reconnect the printer, which saves time & effort.
Obviously, the network printer might use a specific internet connection (local network) to perform such actions. But somehow, the HP printer can’t show up on the network that the computer is using due to multiple reasons. It can be a different network connection, an outdated printer driver , not supporting dual-band Wi-Fi , incorrect setup configuration, print spooler service not running, and more.

Fix HP Printer Not Showing Up on Network
If your HP Printer is not visible or recognizable on the computer’s connected network during the setup process that means there is some glitch or networking connectivity issue. Make sure to first disconnect the printer cable from the router and the computer then reset the HP printer to its default factory settings. Then you’ll need to re-configure the printer on the network.
Let us explain all the troubleshooting methods below. You should follow all methods individually to resolve such an issue.
1. Power Cycle the HP Printer and the PC
Always try to perform the power cycle method on your computer as well as other problematic devices to verify if the issue still bothers you or not. Power Cycle basically an advanced version of restarting the device which helps refresh the system glitch without any major troubleshooting. As this kind of method already helped a lot of users, you shouldn’t avoid it.
- First, shut down both the computer and HP Printer.
- Then unplug the power cord from both devices.
- Wait for around 5 minutes and then reconnect the power cord again.
- Now, turn on both devices and check for the issue.
2. Uninstall the HP Printer Device via Control Panel
Sometimes any kind of unknown third-party device application can be installed on your computer in the name of HP Printer, which can also interfere with the printer connectivity or its operations. It’s better to uninstall the HP Printer Device or similar application from your PC via Control Panel (if found).
- Go to the Start menu and search for Task Manager .
- Now, go to Processes , and single-click on HPDriver.exe .
- Click on End Process to close the task.
- Once done, go to the Start menu and search for Control Panel .
- Then open Control Panel and go to Programs .
- Next, click on Programs and Features .
- Search for the HP Printer Device application in the list.
- Right-click on the HP Printer Device app and select Uninstall .
- Follow the on-screen prompts and complete uninstallation.
3. Perform the Factory Reset on the HP Printer
Additionally, you’ll have to perform a factory reset on the HP Printer to avoid incorrect configuration or settings. Remember that restoring the factory default will remove all custom settings from the printer.
- Open the Setup menu on your HP printer’s interface.
- Click on Tools and select the Restore Factory Default option.
- If your printer does not have a screen then long-press the Cancel button and network (Wi-Fi) button for around 10 seconds until the Wi-Fi and Power indicators start blinking.
- Now, you can reconfigure the HP Printer again with the setup process.
4. Reconfigure the HP Printer to the Network
Whenever your HP Printer gets added to the Devices and Printers list, only then your connected printer will be shown on the computer. Once detected by the Windows system, the device drivers will also get installed automatically these days. So, you’ll need to add the HP printer to the network before doing anything else.
- Open the Start menu then search for Control Panel .
- Open Control Panel and go to Hardware and Sound .
- Click on Devices and Printers .
- Now, click on Add a printer .
- You’ll receive a popup and select your specific printer model there.
- If your PC doesn’t detect your printer automatically, click on The printer that I want isn’t listed .

- Click on Select a shared printer by name .
- Type in your printer name in the text box and click on the Next button.
- Your PC will connect to the printer. Now, check if your network printer is recognizable on the PC or not.
5. Connect the Same Network for Both Devices
You should also connect both PC and Printer to the same network to avoid the network printer connectivity or recognization issue.
6. Update the HP Printer Driver
Another thing you should do is to update the HP Printer Driver on the Windows computer by following the steps below. It’ll help in fixing the outdated printer driver. A new device driver mostly brings stability and improvements to its previous version.
- Open the Start Menu and search for Device Manager .
- Now, launch Device Manager then double-click on Print Queues .
- Right-click on the printer device driver.
- Select Update driver and choose Search automatically for drivers .
- It’ll search for available updates and automatically start downloading.
- Once installed, the system will automatically reboot the system to apply changes.
In case, your PC doesn’t have the required printer driver version or no updates are available then make sure to visit the official website of the HP Software & Driver Downloads webpage to get the latest drivers for the particular model. Next, you can install the driver.
7. Ensure the HP Printer and PC are Connected to a Single-Band Wi-Fi
You should also ensure that the HP Printer and the PC are connected to a single-band Wi-Fi network so that the Windows system can detect the printer. The chances are possible that your HP printer has 2.4GHz single-band Wi-Fi support. So, don’t connect the printer and computer to a 5GHz dual-band Wi-Fi network.
8. Restart and Enable the Print Spooler Service
You should try restarting and enabling the print spooler service on the Windows system manually by following the steps below to ensure there is no issue with the print spooling or queuing. If this service isn’t running or not active yet then make sure to restart and enable it.
- Go to the Start menu and search for Services.
- Open the Services app and locate Print Spooler .
- Now, double-click on the Print Spooler service to open its properties.

- Under the General tab, select Automatic from the Startup type .
- Click on Apply and then click on Start .
- Then click on OK to save changes and reboot the PC.
9. Run the Printer Troubleshooter
The troubleshooter method can also help you find and resolve multiple unknown issues you might not generally find as a warning or error notice. If you’ve already tried out all of the above methods, then you should run the printer troubleshooter by following the steps below.
- Press the Windows+I shortcut keys to open Settings .
- From the System tab, click on Troubleshoot .
- Click on Other troubleshooters .

- Click on the Run button next to the Printer .
- Then follow the on-screen prompts and complete the process.
- It’ll help in fixing the HP printer network connectivity issue with the computer.
10. Contact HP Customer Support
Finally, you should contact HP Customer Support and submit all details regarding the HP Printer not showing up on the network with your computer to fix this issue. If nothing helps you, try to raise the ticket to get dedicated help.
How to Fix HP Laptop Won’t Turn On Problem
How to Hard Reset/Factory Reset HP Laptop Windows 7/8/10/11
How To Take a Screenshot On HP Laptop
How to Update BIOS on HP Windows 10,11 Desktop/Laptop
How to Fix HP Scanner Not Working in Windows 11
How to Fix Error 740 While Adding Printer on Windows 10/11
How To Delete Printer Driver In Windows 11
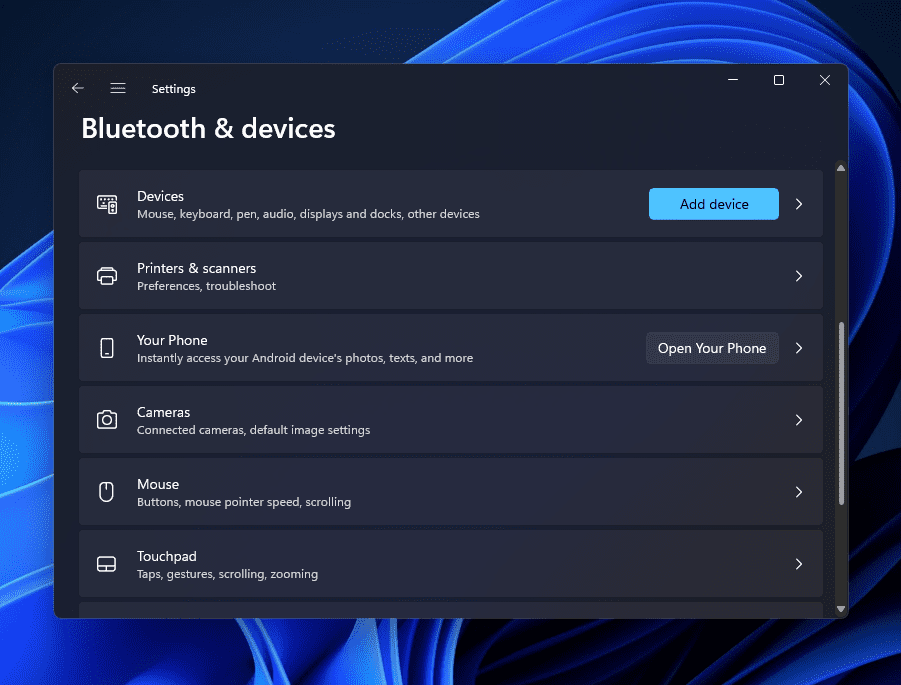
Wireless printers can be added to your Windows 11 PC for wireless printing convenience.
Follow steps to manually add a wireless printer in Windows 11: Open Settings, go to Bluetooth & devices, click on Printers & scanners, and Add device.
If the printer isn’t listed, add it manually by selecting Add a Bluetooth, wireless, or network discoverable printer and following the prompts to successfully add the printer.
Today’s printers have both wired and wireless connections that you can use to connect them to your computer. After connecting the wireless printer to your wireless network, you can print wirelessly from anywhere in your house. You may want to add your wireless printer to your PC if you have a new printer or if you have recently installed Windows 11 on your system. If you wish to install a wireless printer to Windows 11 without know-how, this article will guide you through the process.
How To Add a Printer to Windows 11
This article will go through how to set up a wireless printer in Windows 11.
Adding Wireless Printer In Windows 11
Most probably, Windows 11 should find the wireless printer once your PC and the printer are connected to the same Wi-Fi network. However, if the wireless printer is not added automatically in Windows, then you can follow the steps given below to add the wireless printer in Windows PC manually-
- Open the Settings app on your PC by pressing the Windows + I key combo. Then, you can either search for the Settings app in the Start Menu or hit Enter to open the Settings app.

- Head to the Bluetooth & devices section from the left sidebar of the Settings app, and then on the right side, click on Printers & scanners.
- Click on the Add device button next to the Add a printer or scanner option.
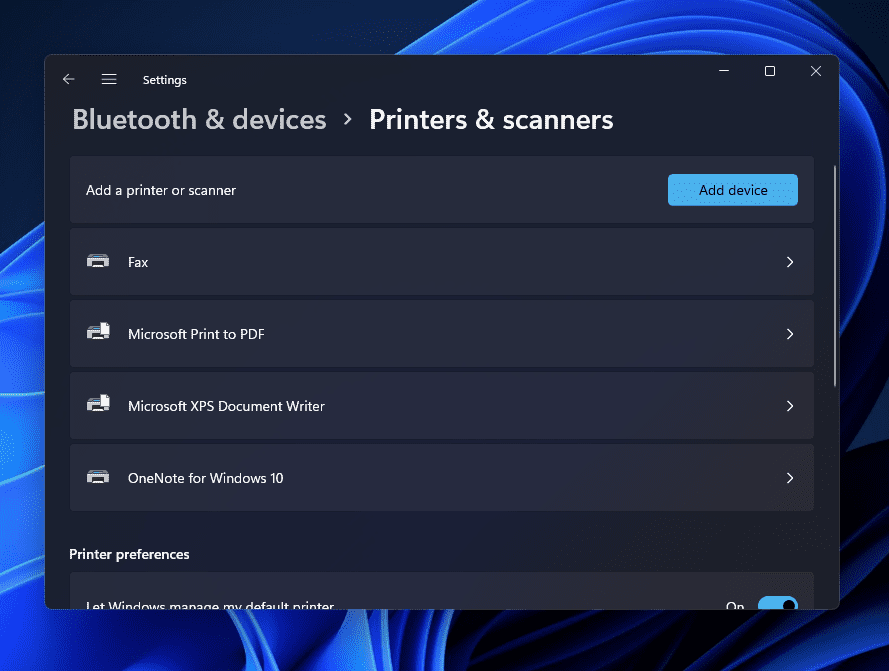
- You should now find the printer listed here. If you get a message saying ‘The printer that I want isn’t listed , then click on Add Manually button.
- Select the Add a Bluetooth, wireless, or network discoverable printer and then click on the Next button on the next window.
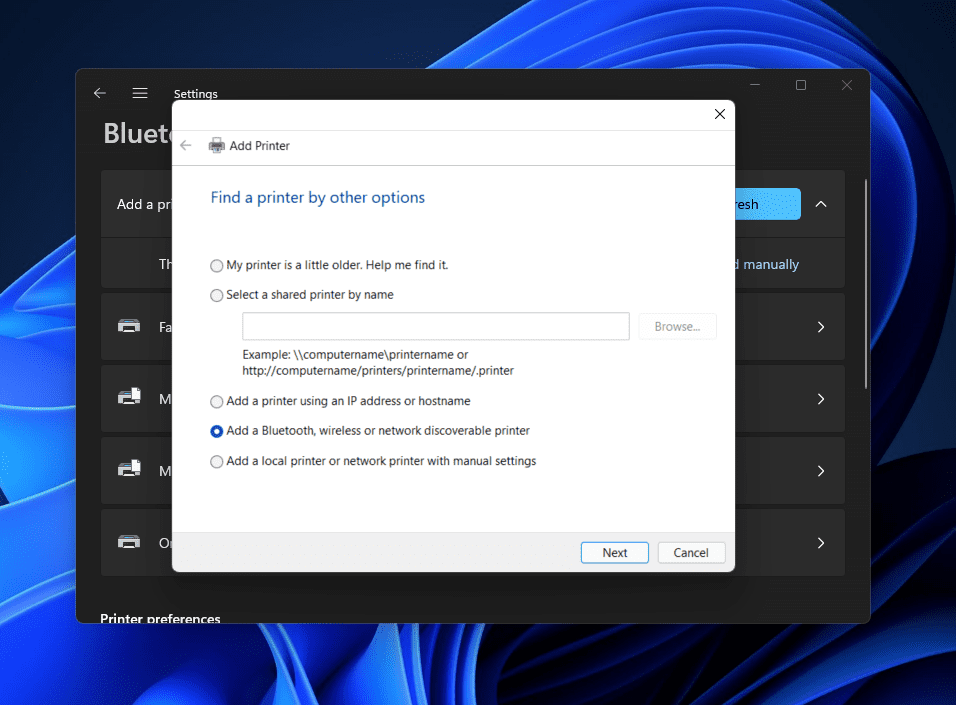
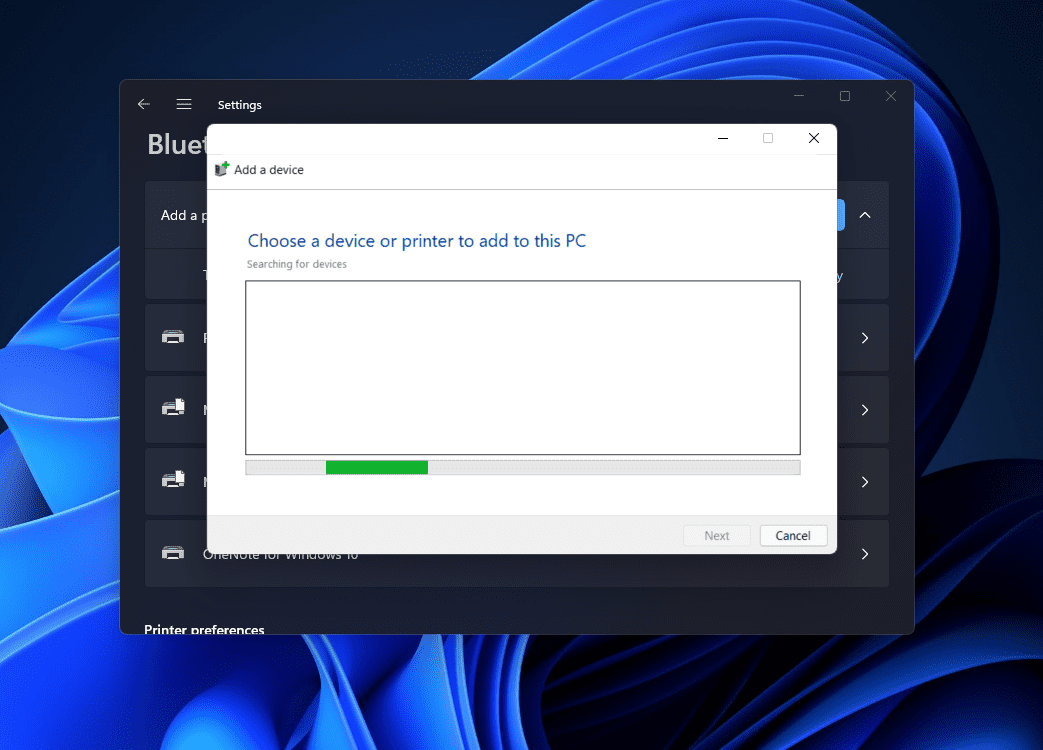
- Next, you will see your printer listed. Select the printer you want to add to your PC from the list and click on Next.
- If Windows 11 locates the printer through the IP address but cannot get the driver’s location, then click on Have Disk button to install the printer software manually.
- Once done, the printer will be added to Windows 11 successfully.
Suppose no printer is found even after trying all the above steps. In that case, you should probably try downloading the printer software/driver from the internet.
RELATED GUIDES:
- How To Delete Printer Driver In Windows 11
- How To Install Windows 11 Printer Drivers Easily
- Top 10 Best Audio Voice Recorder for Windows 11 PC
- How To Fix Windows 11 Printer Spooler Error
- How to Get Printer Online Issue on Mac
Bottom Line
If you have a wireless printer that you want to add to Windows 11, this article might prove helpful. In this article, we have discussed the complete step-by-step process to add a wireless printer to your PC. You can follow the steps given above to add a wireless printer to Windows PC.
- Windows Users encountering Error 740 while trying to add printers on Windows 10/11
- Users facing issues related to network privileges, administrative authorities, and printer drivers
- Solutions include checking printer connectivity, cables, disabling User Account Control, running Printer Troubleshooter, updating drivers, and checking for Windows updates.
The Windows Users are frustrated with a new issue that is not letting them add the printer on Windows 11 or 10. Whenever they try to add the printer on Windows 10 or 11, they get Error 740. Even after a lot of new updates, Windows 11 is still not free from bugs and issues. The users are complaining about various issues in the Windows Community, which shows that many users are stuck with different issues on Windows.
The users who have the printer have reported getting Error 740 and will add the printer to the Printer Wizard Menu. They cannot determine why this error comes to them when they add the printer on Windows 10 or 11. Some users who have Windows 10 have also reported the issue. We are here with a guide on How To Fix the Error 740 Adding Printer issue. We will also explain the reasons why you are getting this issue. So, let’s start with the guide to learn how to resolve the issue.

What is Error 740 on Windows 11 Add Printer?
The users who are trying to add the printer on their Windows 11 have reported that they are getting Error 740 Adding Printer . If you are also getting the same issue, you might have seen the message elaborating on the network privileges or administrative authorities. There are chances that the issue might be occurring due to various reasons. We will list the common reasons for the cause of the issue below. You can check them, as it will help you resolve the issue without hassle.
- The printer is not connected properly.
- There are some network driver issues with Windows 11.
- The printer driver is not installed on the device properly.
- The printer wizard is not getting administrative privileges.
- There are some problems with the printer.
Fix Error 740 While Adding Printer on Windows 10/11
Many of you are frustrated with the Error 740 Adding Printer issue. The issue is not very complex to resolve. You can easily resolve it with the help of the methods we will list below. You must ensure you implement them on your system without any issues.
Check the Connectivity of the Printer
The users must ensure that the printer they try to add is appropriately connected to their system. If you don’t know, sometimes the cables provided by the printer are loose, so it cannot make proper connections with the system. Also, if you are using any cable that is physically damaged or there are some issues with it, then it’s likely that the issue of error 740 adding printer will occur. We suggest you check the printer’s connectivity on your system before starting the printer wizard. You can quickly check it from the Devices and Printers available in the Control Panel.
Check For Cables

We suggest you check the cables that are provided with the printer. You also have to check whether the power cable is working properly. Sometimes the printer is not getting a properly stabilized power supply due to any fault of the power outlet or cable, and the users get the error 740 adding printer issue. Thus, we will suggest you check the printer cables and ensure they are in working condition. If there is any physical damage to it, then you have to get it repaired.
Disable The User Account Control
You can also disable the User Account Control on your Windows while installing the printer. The User Account Control manages the apps from making changes, so there are chances that it might be causing conflicts in adding the printer. Thus, we suggest you disable the User Account Control with the steps listed below to check whether the issue has been resolved.
- Press Windows + R Key to Open Run .
- Now, type useraccountcontrolsettings and click Enter .
- After it, drag the slider to Never Notify and press the OK button to save the changes.
- Check whether the issue has been resolved by adding the printer again.
- Once the printer has been added, set the slider to normal settings again.

Run The Windows Printer Troubleshooter
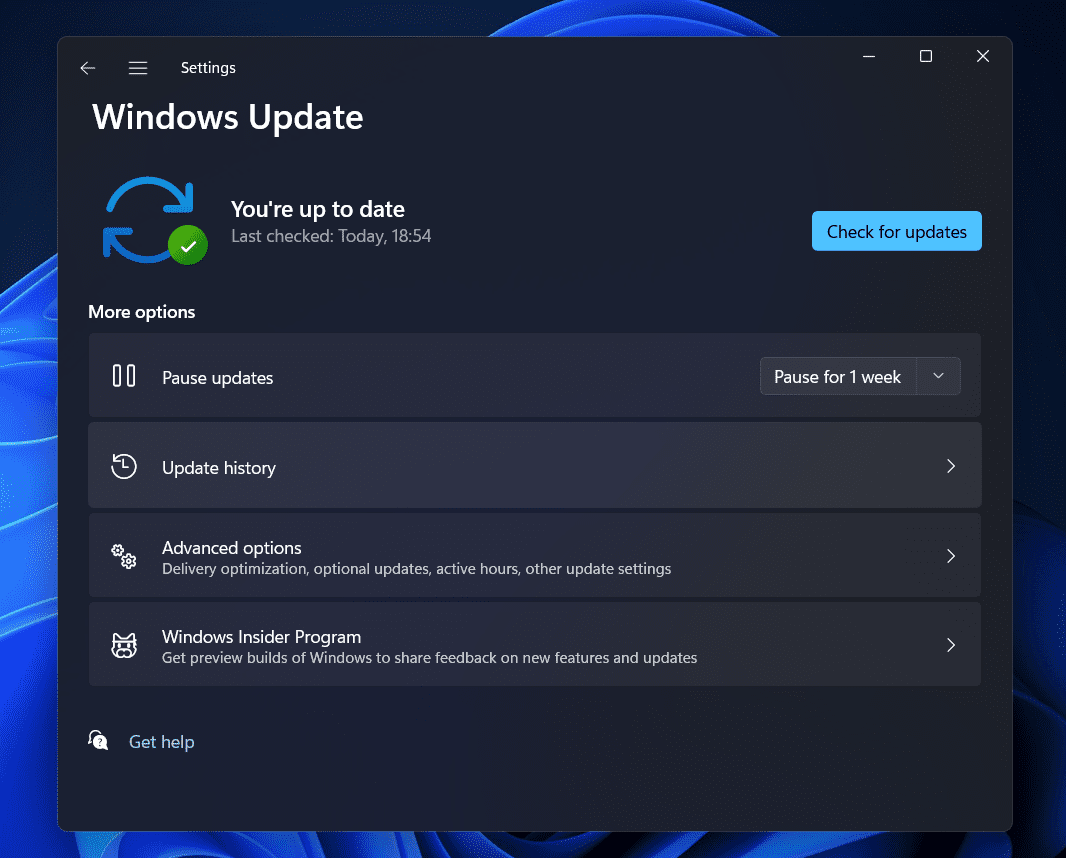
You can also try running the Windows Printer Troubleshooter to evaluate if there are any hardware or software issues with the printer. Windows gives a feature through which users can troubleshoot the printer independently. The steps will be going to be very simple for you. The user only has to run the Windows Printer Troubleshooter; after it, the troubleshooter will start looking for possible issues. If any issues are detected, the troubleshooter will show it on the screen. It will also resolve the issue if it is a software problem. If it is a hardware problem, you must contact the service center. You can follow the steps which are listed below to run the Windows Printer Troubleshooter.
- Press Windows + I Key to open Settings .
- Now, click on Troubleshoot after scrolling down in the System section.
- Select the Other Troubleshoot option .
- After it, click on the Run option just near the Print option .
- Follow the on-screen instructions and wait for the process to get completed.

Check The Printer Drivers
There are chances the printer that you are trying to use might not be working due to the driver’s issue. We expect the printer drivers might not have been installed on your system, so you are getting such issues. We suggest you check the printer drivers by going to the device manager. If you have not updated it for a long time, then update it. However, if it is updated, uninstall the driver and reconnect the printer to install the driver again to ensure there are no software issues. After uninstalling or updating the printer’s driver, restart the system and check again.
Check For Windows Update
Sometimes, your outdated Windows version can also cause issues in adding a printer. We all know that all the software and hardware rely on Windows to work properly. If you are not using the latest Windows version on your PC, you will likely be facing issues with it. We suggest you check for the Windows update on your system to ensure you are using the latest Windows version. If any updates are available for the system, download and install it. After it, try to connect and add the printer to your system again.
Wrapping Up
Users are frustrated with getting the Error 740 Adding Printer on the Windows. Many users have searched for a guide to fix the issue and add the printer to their Windows without any issues. However, they were not able to do so even after a lot of tries. In this guide, we have listed the methods that will help you resolve your problem.
How To Add Wireless Printer In Windows 11
How to Get Online Printer Issue on Mac
Get Printer Online on Windows 10 (Offline to Online)
How To Fix Windows 11 Printer Spooler Error
How To Install Windows 11 Printer Drivers Easily
How To Delete Printer Driver In Windows 11
Delete Restore Point In Windows 11
Deleting printer drivers in Windows 11 can fix printer-related issues
Use the Settings app to delete printer drivers easily:
Open Settings using Windows + I
When there’s some problem with the printer, and you cannot use it on your PC, the best way to fix the issue would be to remove the printer driver. Well, many people prefer removing the printer and then installing it again, and to some extent, that can do the job if the issue is not due to the hardware issues. If you have been facing issues with the printer and want to delete the printer driver, fortunately, you do have the option to do so.
Delete Printer Driver In Windows 11
In this article, we will be discussing how you can delete a printer driver in Windows 11 .
Deleting Printer Driver Through The Settings App
The very first way to delete printer drivers is through the Settings app. To delete the printer driver through the Settings app, follow the steps given below-
- Press the Windows + I key to open the Settings app on your PC.
- Next, click on the Bluetooth & devices on the left sidebar of the Settings app.

- Now on the right side, click on the Printers & Scanners. You will see a list of all the printers you have added to your PC.

- Click on the printer for which you want to delete the driver. Now, click on the Remove button next to the printer to remove it along with the drivers associated with it.

- If you are asked to confirm deleting the printer driver, click on Yes. Once done, restart your PC for the changes to take effect.
Deleting Printer Driver Using Print Management
Another way to do so is by using print management. Follow the steps given below to delete the printer driver using the print management-
- Press the Windows key on your keyboard to open the Start Menu. In the Start Menu, search for Print Management and then click on it to open the app window.
- Expand the Custom Filters section on the left sidebar of the Print Management app window.
- You will now see a list of all the printer drivers on your PC.
- Select the drive that you want to remove from your PC. Right-click on it, and then click on the Remove Driver Packager option.
- You will be asked to confirm removing the driver. When asked to confirm your choice, click on Yes.
- This will delete the printer driver from your PC.
Deleting Printer Driver Using Command Prompt
You can also delete the printer driver using the Command Prompt. Given below are the steps to delete the printer driver using the Command Prompt-
- You will have to launch the Command Prompt as administrator. To do so, open the Start Menu and search for CMD. Now, right-click on the Command Prompt and click on Run as administrator.

- In the Command Prompt, type the command wmic printer get name and hit Enter to execute.
- You will now see the list of all the printers on your PC.
- Next, type the command printui.exe /dl /n “YOUR-PRINTER-NAME” and execute it. You will have to ensure you replace YOUR-PRINTER-NAME with the printer’s name that is displayed on the list.

- The printer will now get removed. Ensure you restart your PC after doing so.
Deleting Printer Driver Using PowerShell
The last way to delete the printer driver is by using PowerShell. You can do so by following the steps given below-
- Press the Windows + X key combo, and then from the menu, select Windows Terminal (Admin).
- Now enter the command Get-Printer | Format-List Name in the Windows PowerShell and hit Enter to execute the command.
- Next, type the command Remove-Printer-Name “Your-Printer-Name” and hit Enter. Ensure you replace Your-Printer-Name with the name of the printer you see here.
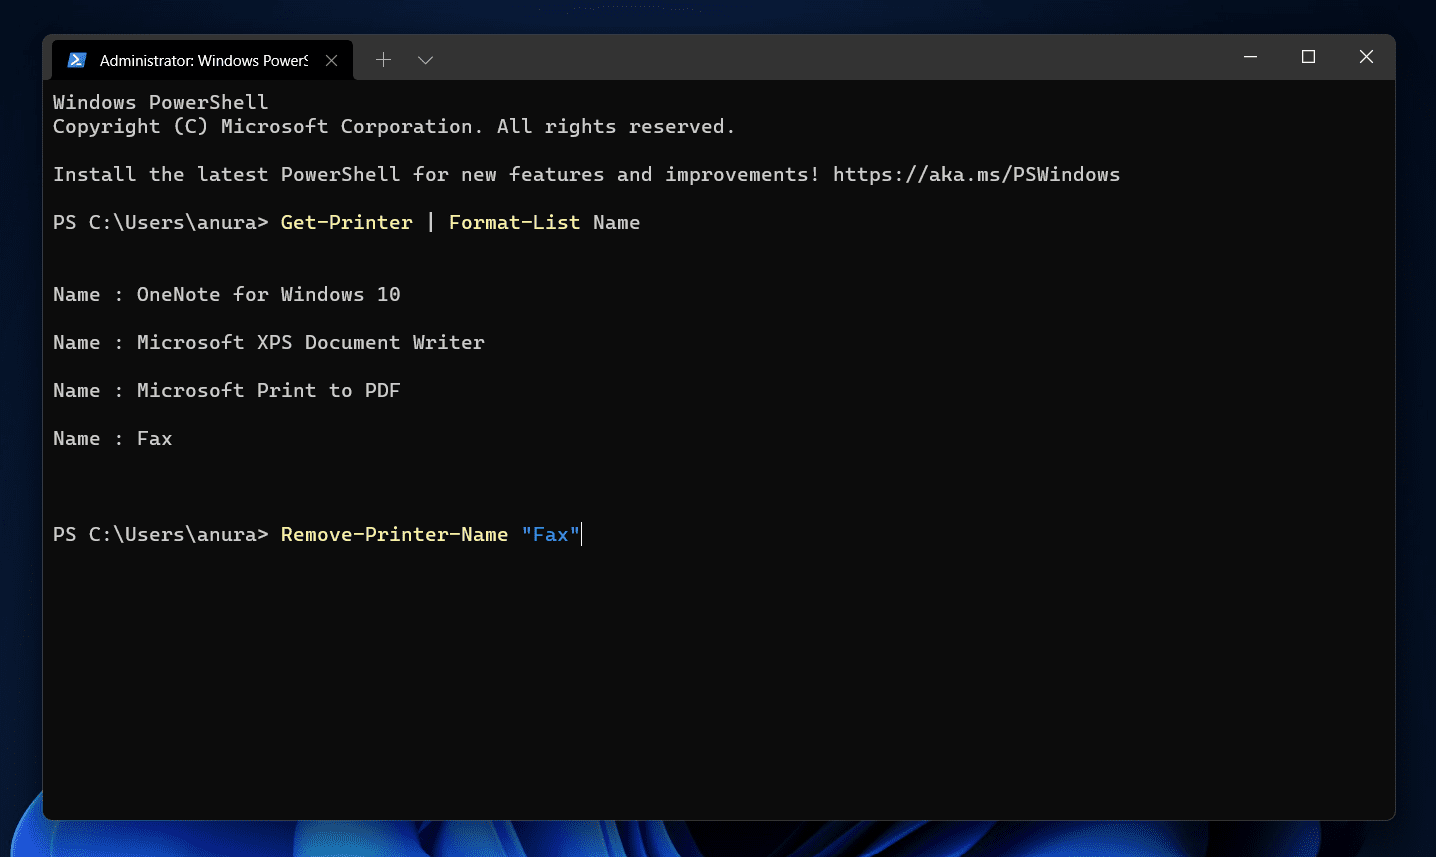
- This will remove the device along with its driver.
RELATED GUIDES:
- How to Create PDF File in Windows 11
- How to Install Windows 11 Printer Drivers Easily
- How to Fix Windows 11 Printer Spooler Error
- Top 5 Ways to Fix Windows 11 23H2 Copilot Not Showing
Final Words
This is how you can delete the printer driver on Windows 11. We have discussed the four ways to delete printer drivers in Windows 11 easily. Following the above steps, you will remove the printer driver in Windows 11.
- HP INC. is a leading information technology company known for manufacturing printers, desktops, laptops, and more.
- HP printers on a network allow multiple users to access the same printer without reconnecting, saving time.
- To fix HP Printer Not Showing Up on Network, troubleshoot by power cycling, uninstalling devices, performing factory resets, updating drivers, and connecting devices to the same network.
HP INC. is one of the well-known multinational information technology companies based in America that manufactures personal desktops, laptops, computer peripherals, printers, printer-related supplies, 3D printing solutions, and more. Talking about the HP Printers for both Home and Business are exceptionally good in terms of price-to-performance ratio. However, the HP Printer Not Showing Up on the Network on the computer is somehow frustrating.
A Network Printer can be any standard or AIO printer from HP, which can easily be accessible by the same network connection on the Windows desktop/laptop. So that other users can use the same printer, which will be connected to the same network. In that case, users in the same office or store or home desk won’t have to disconnect and reconnect the printer, which saves time & effort.
Obviously, the network printer might use a specific internet connection (local network) to perform such actions. But somehow, the HP printer can’t show up on the network that the computer is using due to multiple reasons. It can be a different network connection, an outdated printer driver , not supporting dual-band Wi-Fi , incorrect setup configuration, print spooler service not running, and more.
Fix HP Printer Not Showing Up on Network
If your HP Printer is not visible or recognizable on the computer’s connected network during the setup process that means there is some glitch or networking connectivity issue. Make sure to first disconnect the printer cable from the router and the computer then reset the HP printer to its default factory settings. Then you’ll need to re-configure the printer on the network.
Let us explain all the troubleshooting methods below. You should follow all methods individually to resolve such an issue.
1. Power Cycle the HP Printer and the PC
Always try to perform the power cycle method on your computer as well as other problematic devices to verify if the issue still bothers you or not. Power Cycle basically an advanced version of restarting the device which helps refresh the system glitch without any major troubleshooting. As this kind of method already helped a lot of users, you shouldn’t avoid it.
- First, shut down both the computer and HP Printer.
- Then unplug the power cord from both devices.
- Wait for around 5 minutes and then reconnect the power cord again.
- Now, turn on both devices and check for the issue.
2. Uninstall the HP Printer Device via Control Panel
Sometimes any kind of unknown third-party device application can be installed on your computer in the name of HP Printer, which can also interfere with the printer connectivity or its operations. It’s better to uninstall the HP Printer Device or similar application from your PC via Control Panel (if found).
- Go to the Start menu and search for Task Manager .
- Now, go to Processes , and single-click on HPDriver.exe .
- Click on End Process to close the task.
- Once done, go to the Start menu and search for Control Panel .
- Then open Control Panel and go to Programs .
- Next, click on Programs and Features .
- Search for the HP Printer Device application in the list.
- Right-click on the HP Printer Device app and select Uninstall .
- Follow the on-screen prompts and complete uninstallation.
3. Perform the Factory Reset on the HP Printer
Additionally, you’ll have to perform a factory reset on the HP Printer to avoid incorrect configuration or settings. Remember that restoring the factory default will remove all custom settings from the printer.
- Open the Setup menu on your HP printer’s interface.
- Click on Tools and select the Restore Factory Default option.
- If your printer does not have a screen then long-press the Cancel button and network (Wi-Fi) button for around 10 seconds until the Wi-Fi and Power indicators start blinking.
- Now, you can reconfigure the HP Printer again with the setup process.
4. Reconfigure the HP Printer to the Network
Whenever your HP Printer gets added to the Devices and Printers list, only then your connected printer will be shown on the computer. Once detected by the Windows system, the device drivers will also get installed automatically these days. So, you’ll need to add the HP printer to the network before doing anything else.
- Open the Start menu then search for Control Panel .
- Open Control Panel and go to Hardware and Sound .
- Click on Devices and Printers .
- Now, click on Add a printer .
- You’ll receive a popup and select your specific printer model there.
- If your PC doesn’t detect your printer automatically, click on The printer that I want isn’t listed .
- Click on Select a shared printer by name .
- Type in your printer name in the text box and click on the Next button.
- Your PC will connect to the printer. Now, check if your network printer is recognizable on the PC or not.
5. Connect the Same Network for Both Devices
You should also connect both PC and Printer to the same network to avoid the network printer connectivity or recognization issue.
6. Update the HP Printer Driver
Another thing you should do is to update the HP Printer Driver on the Windows computer by following the steps below. It’ll help in fixing the outdated printer driver. A new device driver mostly brings stability and improvements to its previous version.
- Open the Start Menu and search for Device Manager .
- Now, launch Device Manager then double-click on Print Queues .
- Right-click on the printer device driver.
- Select Update driver and choose Search automatically for drivers .
- It’ll search for available updates and automatically start downloading.
- Once installed, the system will automatically reboot the system to apply changes.
In case, your PC doesn’t have the required printer driver version or no updates are available then make sure to visit the official website of the HP Software & Driver Downloads webpage to get the latest drivers for the particular model. Next, you can install the driver.
7. Ensure the HP Printer and PC are Connected to a Single-Band Wi-Fi
You should also ensure that the HP Printer and the PC are connected to a single-band Wi-Fi network so that the Windows system can detect the printer. The chances are possible that your HP printer has 2.4GHz single-band Wi-Fi support. So, don’t connect the printer and computer to a 5GHz dual-band Wi-Fi network.
8. Restart and Enable the Print Spooler Service
You should try restarting and enabling the print spooler service on the Windows system manually by following the steps below to ensure there is no issue with the print spooling or queuing. If this service isn’t running or not active yet then make sure to restart and enable it.
- Go to the Start menu and search for Services.
- Open the Services app and locate Print Spooler .
- Now, double-click on the Print Spooler service to open its properties.
- Under the General tab, select Automatic from the Startup type .
- Click on Apply and then click on Start .
- Then click on OK to save changes and reboot the PC.
9. Run the Printer Troubleshooter
The troubleshooter method can also help you find and resolve multiple unknown issues you might not generally find as a warning or error notice. If you’ve already tried out all of the above methods, then you should run the printer troubleshooter by following the steps below.
- Press the Windows+I shortcut keys to open Settings .
- From the System tab, click on Troubleshoot .
- Click on Other troubleshooters .
- Click on the Run button next to the Printer .
- Then follow the on-screen prompts and complete the process.
- It’ll help in fixing the HP printer network connectivity issue with the computer.
10. Contact HP Customer Support
Finally, you should contact HP Customer Support and submit all details regarding the HP Printer not showing up on the network with your computer to fix this issue. If nothing helps you, try to raise the ticket to get dedicated help.
- How to Fix HP Laptop Won’t Turn On Problem
- How to Hard Reset/Factory Reset HP Laptop Windows 7/8/10/11
- How To Take a Screenshot On HP Laptop
- How to Update BIOS on HP Windows 10,11 Desktop/Laptop
- How to Fix HP Scanner Not Working in Windows 11
- How to Fix Error 740 While Adding Printer on Windows 10/11
- How To Delete Printer Driver In Windows 11
