- ‘Command Not Found Brew’ error on Mac is often caused by issues with Homebrew installation, corrupted installation folders, or incorrect path settings.
- To fix the error, you can reinstall Homebrew, adjust the path of Homebrew, correct the Homebrew installation, or install the Arm version of Homebrew for Mac with an M1 chip.
- Make sure Xcode is installed on your Mac to run Homebrew smoothly, and if you encounter the error, follow the provided steps to resolve it effectively.
‘Command Not Found Brew’ generally occurs due to Homebrew on Mac. Homebrew is the package manager for MacOS. This error is encountered when the Homebrew is not installed, the installation folder is corrupted, or you haven’t provided the path.
This is a common error that many Mac users face. If you click on this article in the search result, hoping to find the fix to this error, you won’t be disappointed.
Fix ‘Command Not Found brew’ Error in Mac
This article will list all possible ways to fix zsh: command not found: brew error in Mac.

Reinstall Homebrew
This issue generally occurs when Home Brew is not correctly installed. You can reinstall the Homebrew, which will fix the issue. Given below are the steps to do so-
- Firstly, open the Terminal on your Mac.
- Now, type and execute the following command to uninstall Homebrew on your system-
- /bin/bash -c “$(curl -fsSL https://raw.githubusercontent.com/Homebrew/install/HEAD/uninstall.sh)” Once the process is complete, restart your computer.
- Now, open Terminal again and execute the following command to reinstall Homebrew-
/bin/bash -c "$(curl -fsSL https://raw.githubusercontent.com/Homebrew/install/HEAD/install.sh)"
Change Path Of Homebrew
You might face zsh: command not found: brew error in Mac when the path of the Homebrew is not set correctly. You can set the correct path of the Homebrew to solve this issue. To do so, follow the steps given below-
- Launch the Terminal on your Mac.
- For bash, you can execute the command given below to set the path-
$ echo 'export PATH="/usr/local/bin:$PATH"' >> ~/.bash_profile
- In the case of Zsh, you can execute the command given below to set the path-
echo 'export PATH="/usr/local/bin:$PATH"' >> $HOME/.zshrc
Correct Installation Of Homebrew
Another thing that you can do is correct the installation of the Homebrew. This can be done by executing the following commands in the Terminal one-by-one-
export PATH="/opt/homebrew/bin:$PATH"
export PATH="/opt/homebrew/bin:$PATH"' >> $HOME/.zshrc
Install Arm Version Of Homebrew (Only On Mac With M1 Chip)
Earlier, Mac used to come with an Intel processor, but now Apple Mac comes with Apple Silicon. If you have a Mac with an M1 processor, you will have to install the Arm Version of the Homebrew. To do so, open the Terminal and then execute the following command-
/bin/bash -c "$(curl -fsSL https://raw.githubusercontent.com/Homebrew/install/HEAD/install.sh)"
echo 'eval $(/opt/homebrew/bin/brew shellenv)' >> /Users/$yourdevicename/.zprofile
eval $(/opt/homebrew/bin/brew shellenv)
Install Xcode
To run Homebrew on your Mac, you must install Xcode. If this is not installed, you may encounter zsh: command not found: brew error on your Mac. To install Xcode , follow the steps given below-
- Firstly, launch the Mac Terminal .
- Run the command given below to check if your system has Xcode already installed or not-
/usr/bin/xcodebuild –version
- This will return the Xcode version to your PC. If it shows the version, it means Xcode is installed; otherwise, not.
- If Xcode is installed, skip this step and move to the next one. If Xcode is not installed, then execute the command given below to install it-
xcode-select --install
- Now, run the following command-
/bin/bash -c "$(curl -fsSL https://raw.githubusercontent.com/Homebrew/install/HEAD/install.sh)”
If you are using an M1 Mac, run the following command-
/bin/bash -c "$(curl -fsSL https://raw.githubusercontent.com/Homebrew/install/HEAD/install.sh)"
Conclusion
We hope you find the fix to zsh: command not found: brew error on Mac . If you have been facing this error on your Mac, the above steps should help you fix the issue. However, if you still face this issue, head to the Homebrew repository on GitHub and raise your query. You can raise the issue with appropriate screenshots of the error and all the methods you have tried, and they will guide you with possible ways to fix this issue.
Fix Ask to Buy Notifications Not Working on iPhone, iPad, Mac
Fix MacBook Random Shut Down Issues on macOS 13 Ventura Big Sur
Top 7 Ways to Fix MacBook Fan Running Loud or Overheating
How to Create New Apple ID on iPhone, iPad, Mac, PC, Android
How To Change MAC Address of Android With or Without Rooting
Top 5 Best Browsers for MacOS in 2023
Top 10 Best Text & Code Editors for Mac
How to Get Printer Online Issue on Mac
Printer Offline error is a common issue on Mac and Windows, preventing document printing.
Method 1 involves accessing System Preferences, selecting the offline printer, and clicking ‘Resume Printer’.
Method 2 requires removing and re-adding the offline printer in System Preferences, while Method 3 suggests restarting the MacBook or iMac if previous methods fail.
When using a printer, you will come across several errors. One of the most frequently occurring errors while printing documents remotely is the Printer Offline error which is on Windows as well as on Mac. In this error, your printer will not print any document and a ‘Printer offline‘ message will be displayed on your screen. Recently we shared how to fix printer offline issues on Windows 10 . And in this tutorial, we have shared a simple guide by which you can fix printer online issues on your Macbook or iMac.
How to Get Printer Online Error on Mac
Method 1: Resume Printer.
Step 1- Open System Preferences on your Mac PC with the help of its icon in the Dock.
Step 2- Click on the ‘ Printers & Scanners ‘ option which you will find under the Hardware category.
Step 3- Now, select the printer which is offline and right-click on it. Then, select the ‘ Open Print Queue ‘ option to open the queue window of your Printer.
Step 4- At the top of the queue window, you will find a ‘ Resume Printer ‘ option. Click on it to turn your Printer online.
If your printer does not turn online, go to the next method listed below.
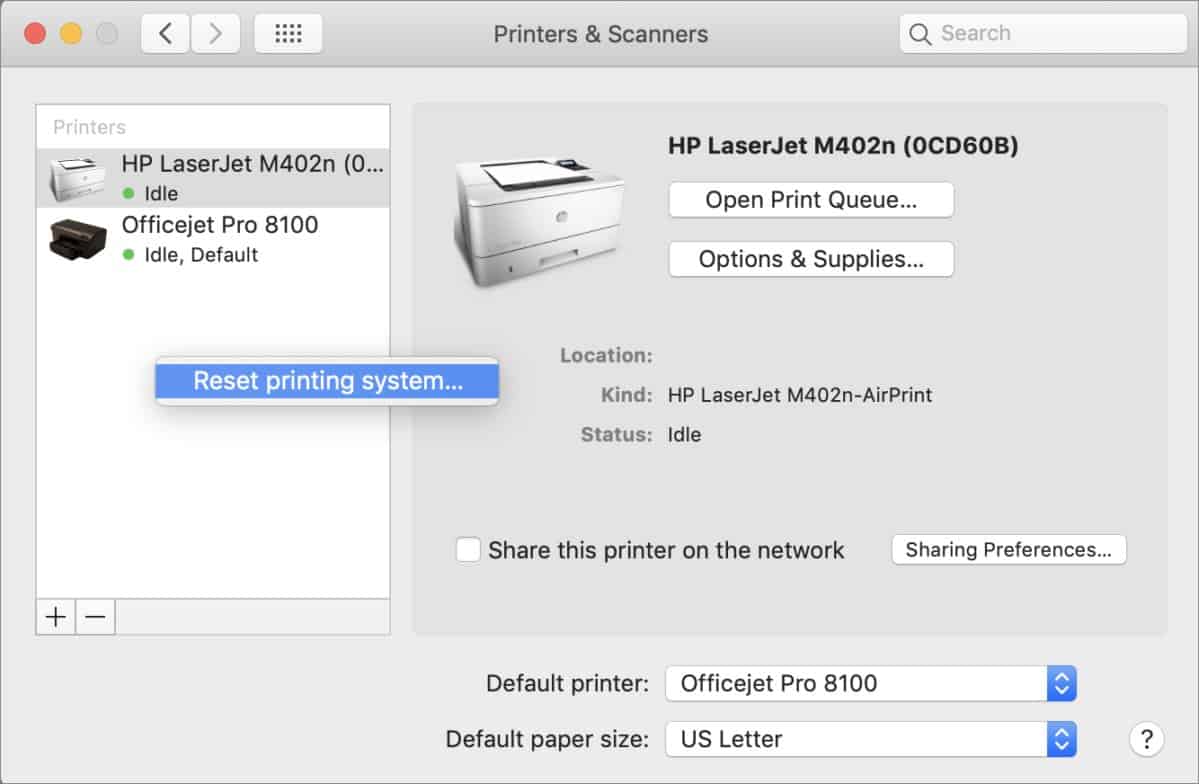
Method 2: Re-Add your Printer.
Step 1- Open System Preferences on your Mac PC with its icon in the Dock.
Step 2- Click on the ‘ Printers & Scanners ‘ option which you will find under the Hardware category.
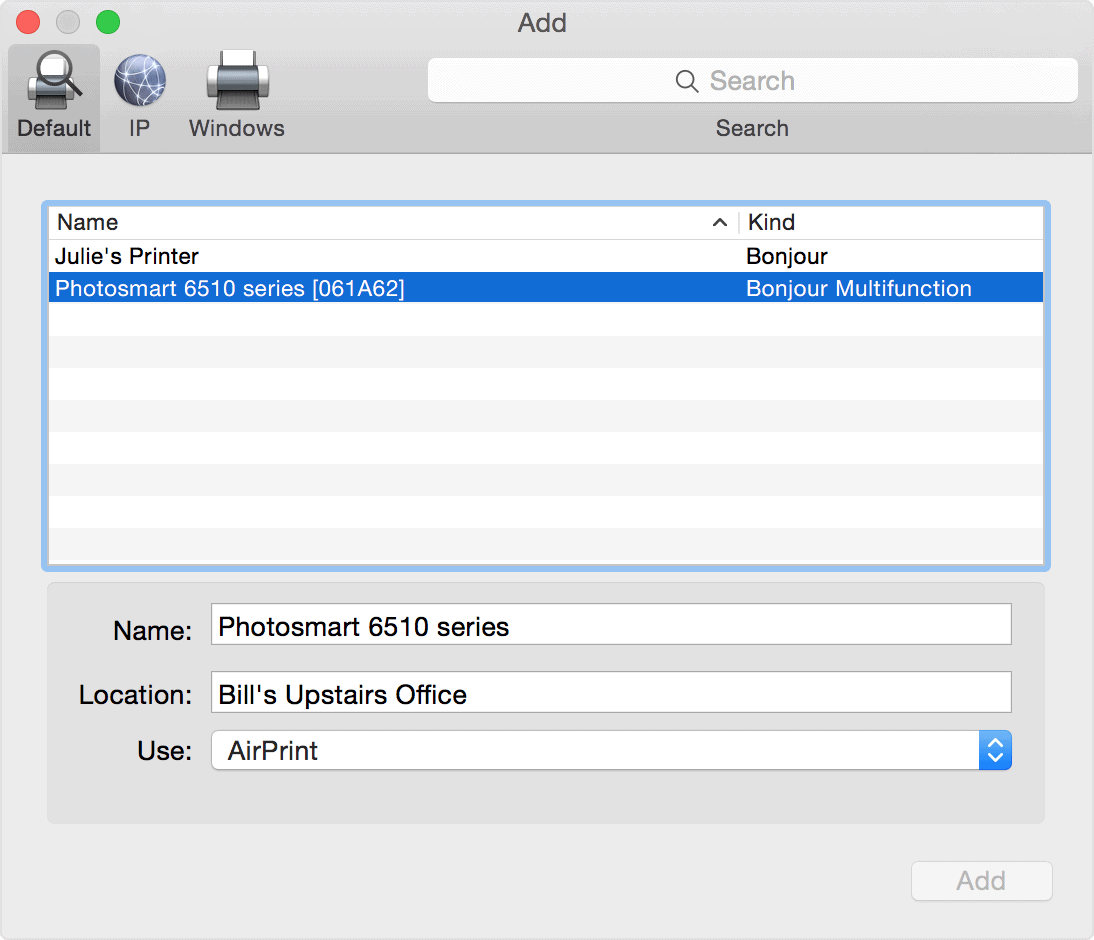
Step 3- Now, select the printer which is offline and right-click on it. Then, select the ‘ Reset printing system ‘ option to remove that particular printer.
Step 4- To re-add your printer, click on the ‘ + ‘ button located at the bottom of the same window.
Method 3: Restart your MacBook or iMac.
If none of the above-listed methods help you in turning your printer online, try restarting your PC. Check if your printer is back online after restarting your PC.
The Verdict:
These were some of the most useful ways which you can use to make your Printer online on your Macbook or iMac MacOS. The steps involved in these methods are easy to execute. We are confident that one of the above-listed methods will help your turn your Printer online. Start executing the methods from the top and work your way down the list till the error is fixed on your PC.
