- After updating to macOS Sonoma, many Mac users find their internet doesn’t work even while connected to Wi-Fi, which can be very frustrating.
- Common causes are corrupted network settings, interference from third-party apps, router compatibility issues, IP address conflicts, and problems with the 5GHz Wi-Fi band.
- Simple solutions include restarting the modem and router, turning off the 5GHz band, forgetting and reconnecting to the Wi-Fi network, disabling VPNs and antivirus software, or resetting network settings.
After updating your Mac to the latest macOS, many users face an unexpected problem — the internet connection stops working, even though the system shows it’s connected to Wi-Fi. This issue has become quite common, especially with the new macOS Sonoma update. In today’s connected world, a working internet connection is essential for most tasks, and facing connectivity issues after an update can be frustrating.
Common Causes of Internet Issues After macOS Update
Issue : Users reported that after updating to macOS Sonoma, their MacBooks appeared to be connected to Wi-Fi, but apps and browsers couldn’t access the internet. Others mentioned they couldn’t connect to the 5GHz Wi-Fi band or were continuously prompted to enter the WPA2 password.
- Corrupted Network Settings : macOS updates can sometimes alter or corrupt existing network settings, preventing the system from connecting to Wi-Fi properly.
- Third-Party Apps Interference : VPNs, antivirus software, and network-monitoring tools like Little Snitch can interfere with your Mac’s network configuration after an update.
- Router Compatibility : Some routers may need to be reset or updated after a macOS update, especially if the new macOS version requires different network protocols.
- IP Address Conflicts : Your Mac might experience IP address conflicts on the network, which can cause connectivity issues.
- Wi-Fi Band Issues : Some users have reported problems specifically with the 5GHz Wi-Fi band after updating macOS, while 2.4GHz networks still work fine.
Internet Not Connecting After macOS Update? Here’s the Fix!
Here are some simple fixes you can try to get your internet connection working again after updating macOS:
1. Restart Your Modem and Router
A quick restart of your modem and router can reset the connection between your devices and your internet service provider (ISP). This is often a simple yet effective solution.
Unplug your modem and router from the power source, wait 30 seconds, then plug them back in. After restarting, try reconnecting your Mac to the Wi-Fi.
2. Turn off the 5GHz Band
Some users find that their Mac has trouble connecting to the 5GHz Wi-Fi band after a macOS update, while the 2.4GHz band works fine. Disabling the 5GHz band temporarily can help resolve the issue.
How to Do It : You will need access to your router settings to disable the 5GHz band. This is usually done by logging into your router’s admin interface through a browser. Look for the wireless settings and disable the 5GHz band, leaving only the 2.4GHz option active. Reconnect your Mac to the Wi-Fi and see if the connection stabilizes.
3. Forget and Reconnect to Your Wi-Fi Network
Sometimes, resetting your Wi-Fi connection on the Mac helps to clear any glitches or incorrect settings that may have occurred during the macOS update.
- Click on the Wi-Fi icon in the top right corner of your screen.
- Select Wi-Fi Settings and find the network you’re trying to connect to.
- Click on Details next to your network and then click Forget this Network .
- Reconnect by selecting the network again and entering the Wi-Fi password.
4. Disable VPNs, Antivirus Software, or Third-Party Network Filters
VPNs, antivirus programs, and network filters like Little Snitch can sometimes block or interfere with internet access, especially after an update.
- Turn off any VPNs by going to System Settings > Network > VPN and disabling it.
- For antivirus software, look for the option to temporarily disable it in the app settings.
- If you’re using any network filters, make sure to disable them and try reconnecting to the internet.
5. Reset Network Settings
If your network settings are corrupted after the update, resetting them can fix the issue.
- Go to System Settings > Network .
- Select Wi-Fi , click on Details , and then forget the network.
- Restart your Mac, reconnect to the Wi-Fi, and enter the password.
6. Create a New Network Location
If old network configurations don’t work well after a macOS update, creating a new network location gives your Mac a fresh start with network settings.
- Go to System Settings > Network .
- Click the Location drop-down menu and select Edit Locations .
- Click + to add a new location, then reconnect to your Wi-Fi.
Resolved: Internet Not Working After macOS Update
If the basic fixes didn’t solve your internet connection problem, here are some more advanced solutions you can try:
7. Boot into Safe Mode
Safe Mode starts your Mac with only essential system files and services, which can help you determine if third-party apps or services are causing the internet issue.
- On Apple Silicon Macs: Shut down your Mac, hold the Power button until you see the Loading startup options screen, then select Safe Mode .
- On Intel-based Macs: Restart your Mac and hold the Shift key while it boots. Keep holding until you see the login screen.
- Once in Safe Mode, check if your internet connection works. If it does, a third-party app might be causing the issue.
8. Reset Date & Time Settings
Incorrect date and time settings can disrupt your internet connection because macOS needs these settings to synchronize with servers correctly.
- Open the Terminal app from Applications > Utilities .
- Type the following command:
sudo rm /var/db/timed/com.apple.timed.plist
- Press Enter and enter your Mac password if prompted.
- Restart your Mac, then go to System Settings > General > Date & Time and enable Set date and time automatically .
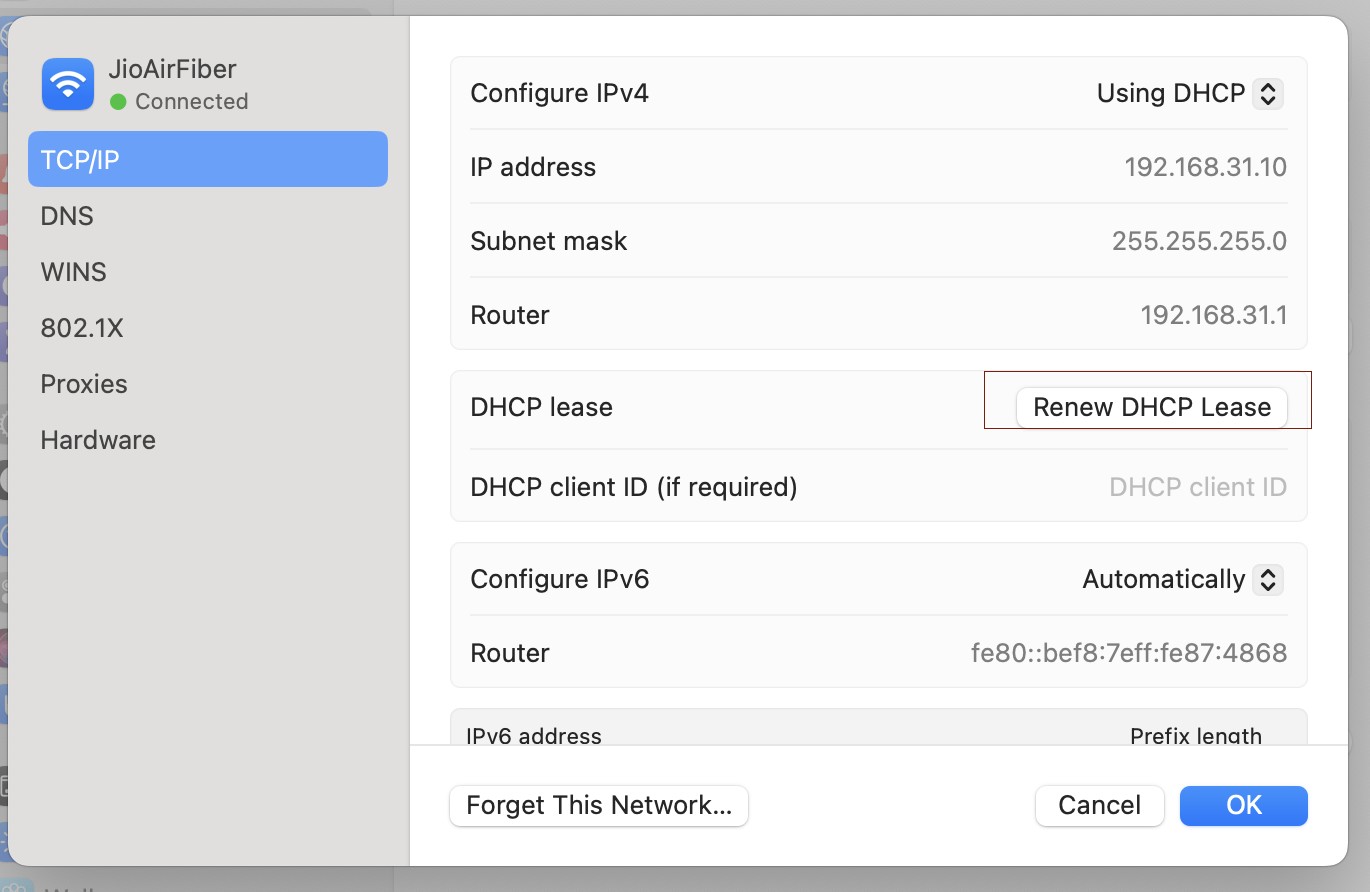
9. Renew DHCP Lease
If your Mac has an IP address conflict or outdated network information, renewing the DHCP lease will request a new IP address from the router, resolving potential conflicts.
- Go to System Settings > Network > Wi-Fi .
- Click on Details next to your Wi-Fi network.
- Select the TCP/IP tab.
- Click Renew DHCP Lease . Your Mac will automatically reconnect with a new IP address.
10. Manually Reset Your Router
In rare cases, the problem might be with your router’s settings, especially if you’ve tried everything else and nothing seems to work.
- Find the Reset button on your router (usually a small hole requiring a pin).
- Press and hold the button for 10-20 seconds to reset the router to factory settings.
- After resetting, set up your Wi-Fi network again and reconnect your Mac.
Conclusion
If your internet stops working after a macOS update, start with simple fixes like restarting your modem, forgetting and reconnecting to Wi-Fi, or disabling VPNs. For persistent issues, advanced steps like Safe Mode or resetting network settings can help. Updating macOS is also important to avoid such problems. If nothing works, contact Apple Support for assistance.
READ ALSO:
Fix HP Printer Connection Issues After Upgrading to macOS Sonoma
External Hard Drives SSD Keeps Disconnecting macOS Sonoma, but Accessible on iPhone
Fixed: WallpaperVideoExtension High RAM and CPU Usage in macOS
Top 10 Ways to Fix macOS Sonoma Battery Draining Fast Issues
Touch ID Stopped Working to Unlock by Single Touch in macOS Sonoma
After updating to macOS Sonoma, many users face problems with HP printers because there are no updated drivers for macOS 14 yet.
If your printer does not support AirPrint or still has issues, try resetting the printer’s settings to clear any old configurations that might be causing problems.
After upgrading to macOS Sonoma, many users have reported issues with their HP printers not working or failing to connect. This is a common problem because HP has not yet released updated drivers compatible with macOS 14, leaving users stuck with non-functional printers. Whether you’re facing issues with printing, scanning, or connecting your HP LaserJet or OfficeJet printer, it can be frustrating to find a solution.
If you’ve been wondering, “Where can I find drivers for HP printers compatible with Sonoma?” , you’re not alone. While there may not be official drivers available for some HP models yet, there are several practical solutions you can try to get your printer back up and running.
How to Fix HP Printer Connection Issues After Upgrading to macOS Sonoma
Let’s dive into the solutions and get your printer up and running smoothly on your new macOS Sonoma!
1. Verify AirPrint Compatibility
One of the simplest ways to avoid driver-related issues with your HP printer after upgrading to macOS Sonoma is to check if your printer supports AirPrint . AirPrint allows you to print wirelessly from your Mac without the need for manufacturer-specific drivers or software. Many newer HP printers come with AirPrint support, which can make the setup process seamless and prevent compatibility problems when the operating system updates.
Why Use AirPrint?
When macOS is updated, some printer manufacturers like HP may not release updated drivers right away, causing printers to stop working. However, if your printer supports AirPrint, it can bypass the need for drivers, allowing you to print directly from your Mac without additional setup.
Steps to Check AirPrint Compatibility:
- Open System Settings: Click the Apple Menu in the top-left corner of your screen and select System Settings .
- Navigate to Printers & Scanners: On the left sidebar, find and click on Printers & Scanners .
- Check for Your Printer: If your printer is not already listed, click the + button to add a new printer.
- Select AirPrint: When your printer shows up in the list, select it. In the Use dropdown menu, check if AirPrint is available as an option. If it is, select AirPrint to set it up.
If AirPrint is Available:
- Your HP printer should work without any additional drivers, and you can start printing right away using macOS Sonoma.
2. Reset Printer Preferences
If your HP printer isn’t working after the macOS Sonoma upgrade and it’s not AirPrint-compatible, resetting your printer preferences is a helpful next step. This can clear any lingering issues caused by outdated drivers or conflicts from the macOS update, allowing you to reconnect your printer as if it were brand new.
Why Reset Printer Preferences?
When you update your Mac’s operating system, it can sometimes cause problems with printer settings. Resetting printer preferences will remove any previous configurations that might be causing issues and help establish a fresh connection between your printer and macOS Sonoma.
- Open System Settings: Click the Apple Menu () in the top-left corner of your screen and choose System Settings .
- Go to Printers & Scanners: In the left-hand sidebar, click on Printers & Scanners .
- Reset Printing System: Right-click (or Control + click) anywhere in the list of printers, and select Reset Printing System from the drop-down menu. A warning will appear asking if you want to reset the printing system. Click Reset to confirm.
- Re-add Your Printer: After the reset, your list of printers will be empty. Click the + button to re-add your HP printer.
- Select Printer from List: Choose your HP printer from the list of available devices and add it. If your printer is connected to the network or via USB, it should appear in the list automatically.
- Install the Correct Driver: If prompted, select the correct driver (if one is available) or opt for the Generic PostScript Printer option, which we will cover in more detail in the next section.
3. Use a Generic PostScript Printer Driver
If resetting your printer preferences didn’t solve the problem and your HP printer isn’t AirPrint-compatible, using a Generic PostScript Printer Driver can be an effective workaround. This option allows you to print basic documents, even if the full range of your printer’s features (like scanning or color printing) isn’t available.
- Open System Settings: Click the Apple Menu and choose System Settings .
- Go to Printers & Scanners: Click on Printers & Scanners in the left-hand sidebar.
- Add a Printer: Click the + button to add a new printer.
- Select Your HP Printer: Your HP printer should appear in the list. Select it.
- Choose a Driver: In the Use dropdown menu, select Generic PostScript Printer . This option allows you to print, although some advanced features like duplex printing or scanning may not be supported.
- Add the Printer: After selecting the driver, click Add to finalize the setup.
4. Download HP Drivers Manually
If using a generic driver doesn’t give you the desired functionality, you can try manually installing older drivers. Many HP printers don’t have updated drivers for macOS Sonoma, but you can often use the drivers for macOS 13 Ventura or earlier. This method can restore full functionality to your printer, including features like color printing and scanning.
- Visit HP’s Support Website: Go to the HP Printer Support Page . Enter your printer model (e.g., HP LaserJet or OfficeJet) in the search box.
- Find the Latest Drivers: HP may only offer drivers for macOS 13 Ventura or older versions. Download the most recent driver available, even if it’s not specifically for macOS 14 Sonoma.
- Install the Drivers: Open the downloaded driver file and follow the installation instructions. Once installed, go to System Settings > Printers & Scanners .
- Add the Printer: Click the + button to add your printer. Your printer should now appear with the installed driver, restoring more advanced functions like scanning and color printing.
Potential Drawback:
You may receive a message like, “This update requires macOS version 13.0 or earlier” when installing the driver, but in many cases, the drivers will still work once installed.
5. Use Pacifist to Force Driver Installation
For more stubborn cases where HP drivers won’t install, you can use Pacifist , a third-party tool, to force drivers to work on macOS Sonoma. Pacifist allows you to open installer packages and manually install specific files, bypassing compatibility issues.
Pacifist is a free app that helps users manage and extract files from installation packages. It can be used to install printer drivers that would otherwise not work with macOS Sonoma, especially for older printers.
- Download Pacifist: Go to Pacifist’s website and download the app.
- Download HP Printer Software: Download the latest HP Printer Software Update from HP’s support page or directly from Apple. If Sonoma drivers are unavailable, download macOS Ventura or Monterey drivers.
- Open the Driver File with Pacifist: Open Pacifist and select Open Package . Navigate to the downloaded HP printer driver package (usually a .pkg file) and open it.
- Install the Drivers: In Pacifist, select HewlettPackardPrinterDrivers.pkg . Click Install at the top of the window to force the installation of the driver.
- Add Your Printer: Once the installation is complete, go to System Settings > Printers & Scanners . Add your printer using the + button.
Note of Caution:
Using Pacifist may not work for every printer model, but it’s a great option for those who are tech-savvy and willing to try additional steps to force drivers to work.
6. Update Printer Firmware
Sometimes, outdated firmware on your printer can cause compatibility issues with macOS updates like Sonoma. Updating your printer’s firmware ensures that it works smoothly with the latest features and security protocols introduced by macOS.
- Go to the HP Support Page .
- Enter your printer model and check for available firmware updates.
- Download the firmware update if available.
- Follow the instructions provided by HP to install the firmware update on your printer.
- After the firmware update, restart both your printer and your Mac.
- Go to System Settings > Printers & Scanners , and re-add your printer if necessary.
7. Reconnect Printer to Wi-Fi and Reset Network Settings
For wireless printers, ensuring your printer and Mac are connected to the same network is crucial. Sometimes, after a macOS update, network settings can get mixed up, causing communication issues between your Mac and printer. Reconnecting your printer to the Wi-Fi network and resetting network settings on your Mac can resolve these issues.
- Go to your printer’s Network Settings (usually through the control panel) and disconnect it from the Wi-Fi.
- Reconnect the printer to the correct Wi-Fi network.
- Go to System Settings > Network > Wi-Fi .
- Click on the i icon next to your current network and choose Forget This Network .
- Reconnect your Mac to the same Wi-Fi network as the printer.
- Go to System Settings > Printers & Scanners .
- Click the + button and add your printer.
8. Use HP Smart App for Easy Setup
If you’re still facing issues after trying other methods, the HP Smart App can simplify the process of setting up and managing your printer. It helps you find your printer on the network and can automatically install necessary drivers and updates.
- Open the Mac App Store and search for HP Smart .
- Download and install the app on your Mac.
- Open the HP Smart App and follow the on-screen prompts to find and connect your HP printer.
- The app will guide you through adding the printer to your network or Mac.
- If necessary, the HP Smart App will prompt you to download and install any missing drivers or firmware updates.
9. Temporary Workaround: Print Using an iPhone or iPad
If you’re unable to get your printer working with macOS Sonoma, using AirPrint on an iPhone or iPad can be a quick and easy workaround to print documents. This method is especially useful for printing from the same network without needing to fully fix the printer issue on your Mac right away.
- On your Mac, save the document you want to print to iCloud Drive or another cloud service accessible from your iPhone or iPad.
- Use the Files app to locate and open the document on your mobile device.
- Tap the Share icon (a square with an arrow pointing up), and select Print .
- Your printer should appear in the list if it’s connected to the same Wi-Fi network.
- Adjust the print settings if needed, and tap Print to send the job to your HP printer.
Conclusion
By following these methods, you should be able to resolve most HP printer connection issues after upgrading to macOS Sonoma. Whether you’re checking for AirPrint compatibility, resetting printer preferences, installing drivers manually, or using tools like Pacifist and HP Smart App, there are multiple ways to get your printer up and running again. If all else fails, using AirPrint from an iPhone or iPad can be a handy temporary workaround.
- External Hard Drives SSD Keeps Disconnecting macOS Sonoma, but Accessible on iPhone
- WallpaperVideoExtension High RAM and CPU Usage in macOS
- Slow Login After macOS Sequoia Update: 9 Ways to Fix it
- Top 10 Ways to Fix macOS Sonoma Battery Draining Fast Issues
- Top 10 Ways to Fix macOS Error Code 10000
