- Updates like macOS Sonoma or third-party apps can make the date and time disappear from your Mac’s menu bar; common solutions include checking menu bar settings, restarting your Mac, and clearing menu bar clutter.
- Advanced fixes involve booting in Safe Mode to check for interfering software, testing in another user account, uninstalling problematic system tools like CleanMyMac, and using Disk Utility to repair disk issues.
Have you recently noticed that the date and time have disappeared from your Mac’s menu bar? This issue has become quite common, especially after macOS updates like macOS Sonoma. Many users rely on the quick access to date and time for their daily tasks, and not having it visible can be frustrating. Whether it’s a simple settings change or a result of system interference, the good news is that there are several ways to fix this issue.
In this article, we will guide you through the common causes of the problem and provide step-by-step solutions to get your date and time back in the menu bar. Whether you’re a novice Mac user or a seasoned expert, these solutions will help you troubleshoot the problem and restore the missing date and time with ease.
Common Causes for Date and Time Disappearance on macOS
The date and time vanishing from the menu bar can be caused by several factors, often linked to recent changes or hidden settings within macOS. Identifying the root cause will help you apply the most effective solution. Here are some common reasons this issue occurs:
1. Recent macOS Updates
One of the most frequent causes of this issue is after updating to a new macOS version, like macOS Sonoma. While updates aim to improve performance, they can sometimes introduce small bugs that affect display settings, including the date and time in the menu bar.
2. Third-Party Apps Interference
Certain third-party apps, particularly system optimizers, cleaners, or antivirus software, can interfere with macOS settings. Apps like CleanMyMac, MacKeeper, or other “optimization” tools can modify or hide system elements, including the menu bar.
3. Incorrect System Settings
Sometimes, the date and time may disappear simply because the settings were unintentionally changed. By default, macOS offers options to customize what appears in the menu bar, and a simple configuration issue could be behind the missing display.
4. Limited Space in the Menu Bar
If you have too many icons in your menu bar (e.g., Wi-Fi, battery, and third-party apps), the date and time might be automatically hidden due to lack of space, especially on Macs with smaller screens or notches.
Fix Date and Time Disappearing from macOS Menu Bar
If your date and time have disappeared from the menu bar, don’t worry—there are some simple steps you can take to restore it. Often, the solution can be found within your system settings or by performing a quick reboot. Here are the most common fixes you can try:
1. Check Menu Bar Settings
The first and easiest step is to ensure that your macOS is configured to show the date and time in the menu bar. Here’s how to check:
- Open System Settings.
- Click on Control Centre .
- Scroll down the left-hand sidebar to find the Clock option.
- Ensure the box for “Show Date” is checked. You can also adjust whether the time is shown in analog or digital format.
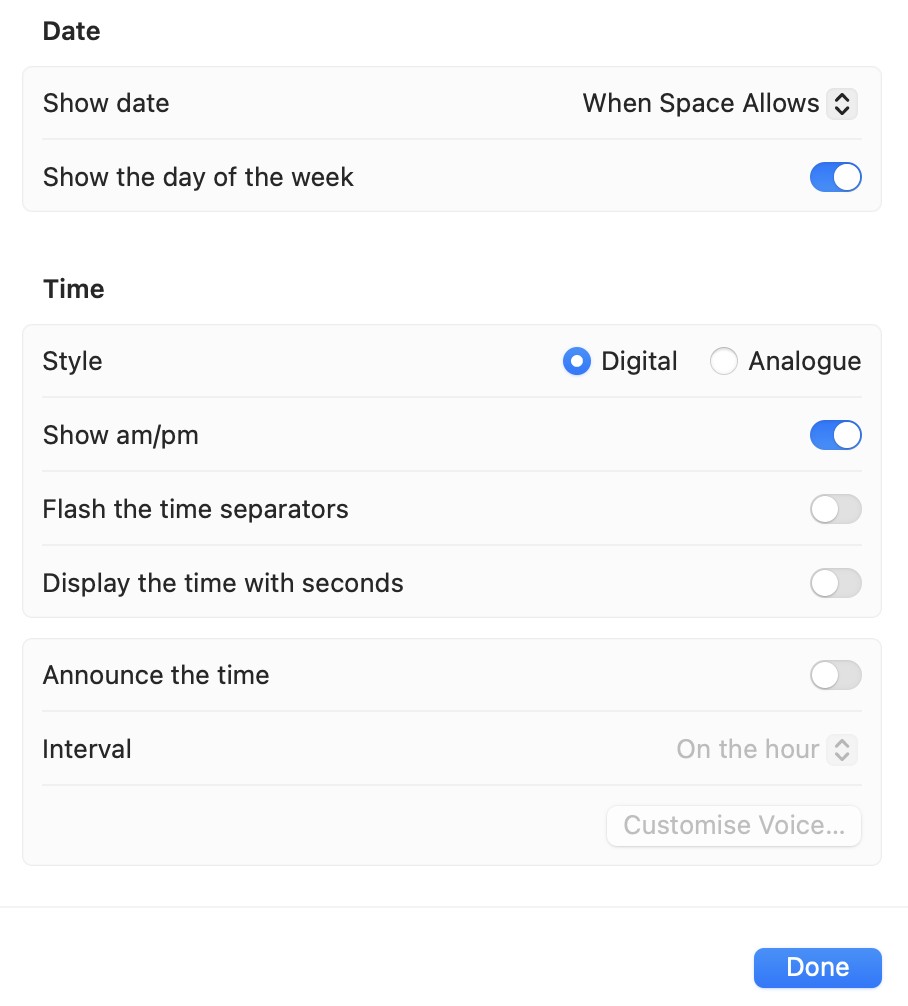
Sometimes, users accidentally disable the date and time in these settings, so making sure everything is correctly set up can fix the issue.
2. Restart Your Mac
A simple restart can resolve many system issues, including missing date and time displays. After system updates or software changes, a restart helps macOS reload its settings properly.
- Click on the Apple logo in the top-left corner of your screen.
- Choose Restart and allow your Mac to reboot.
This will refresh system processes and, in many cases, restore the date and time to the menu bar.
3. Resize the Menu Bar to Free Up Space
If your menu bar is cluttered with too many icons, the date and time may be hidden. Reducing the number of icons displayed can help free up space:
- Click on each menu bar icon while holding the Command key and drag unnecessary icons off the menu bar.
- Make sure there’s enough space for the date and time to reappear. This is especially useful for Macs with notches or smaller screens.
Advanced Troubleshooting: Date and Time Vanished from macOS Menu Bar
If the quick fixes didn’t work, don’t worry—there are more advanced troubleshooting methods you can try. These solutions are designed to address deeper system issues that might be causing the date and time to disappear from your Mac’s menu bar.
1. Use Safe Boot Mode
Safe Boot mode helps you identify whether third-party software or extensions are causing the issue. When you boot in Safe Mode, macOS disables non-essential services, helping isolate the problem.
Step 1: Shut down your Mac.
Step 2: Turn it on and immediately press and hold the Shift key until you see the login screen.
Step 3: Log in (you may need to log in twice).
Step 4: Check if the date and time have reappeared in the menu bar.
If Safe Mode restores the date and time, it’s likely that a third-party app or service is causing the issue. After identifying this, you can remove or adjust the interfering app.
2. Test in Another User Account
Sometimes, the problem is isolated to a specific user account on your Mac. Testing in another account can help determine if this is the case.
Step 1: Open System Settings and go to Users & Groups .
Step 2: Click the lock icon at the bottom and enter your password.
Step 3: Create a new user account by clicking the plus (+) button .
Step 4: Log out of your current account and log into the new user account.
If the date and time appear in the new user account, the problem is specific to your original account. You can then investigate any specific settings or apps causing the issue.
3. Uninstall Problematic Third-Party Apps
Certain third-party apps—especially system cleaners, optimizers, or antivirus software—can interfere with macOS. Some commonly reported apps that may cause issues include:
- CleanMyMac
- MacKeeper
- Dr. Cleaner Pro
Step 1: Open Finder and go to the Applications folder.
Step 2: Drag and drop any third-party system apps (especially optimizers and cleaners) to the Trash .
Step 3: Restart your Mac and check if the date and time have returned.
These advanced troubleshooting methods can help resolve more persistent problems by identifying deeper system interferences or user-specific issues.
Disk Utility Repairs (For Persistent Issues)
If the date and time are still missing from your Mac’s menu bar after trying the previous solutions, it’s time to ensure that your disk is functioning properly. Disk Utility is a built-in macOS tool that helps repair issues related to your hard drive. Running a disk repair can resolve underlying system errors that may be causing the problem.
Open Disk Utility:
- Click on Finder and go to the Applications folder.
- Open the Utilities folder, then select Disk Utility .
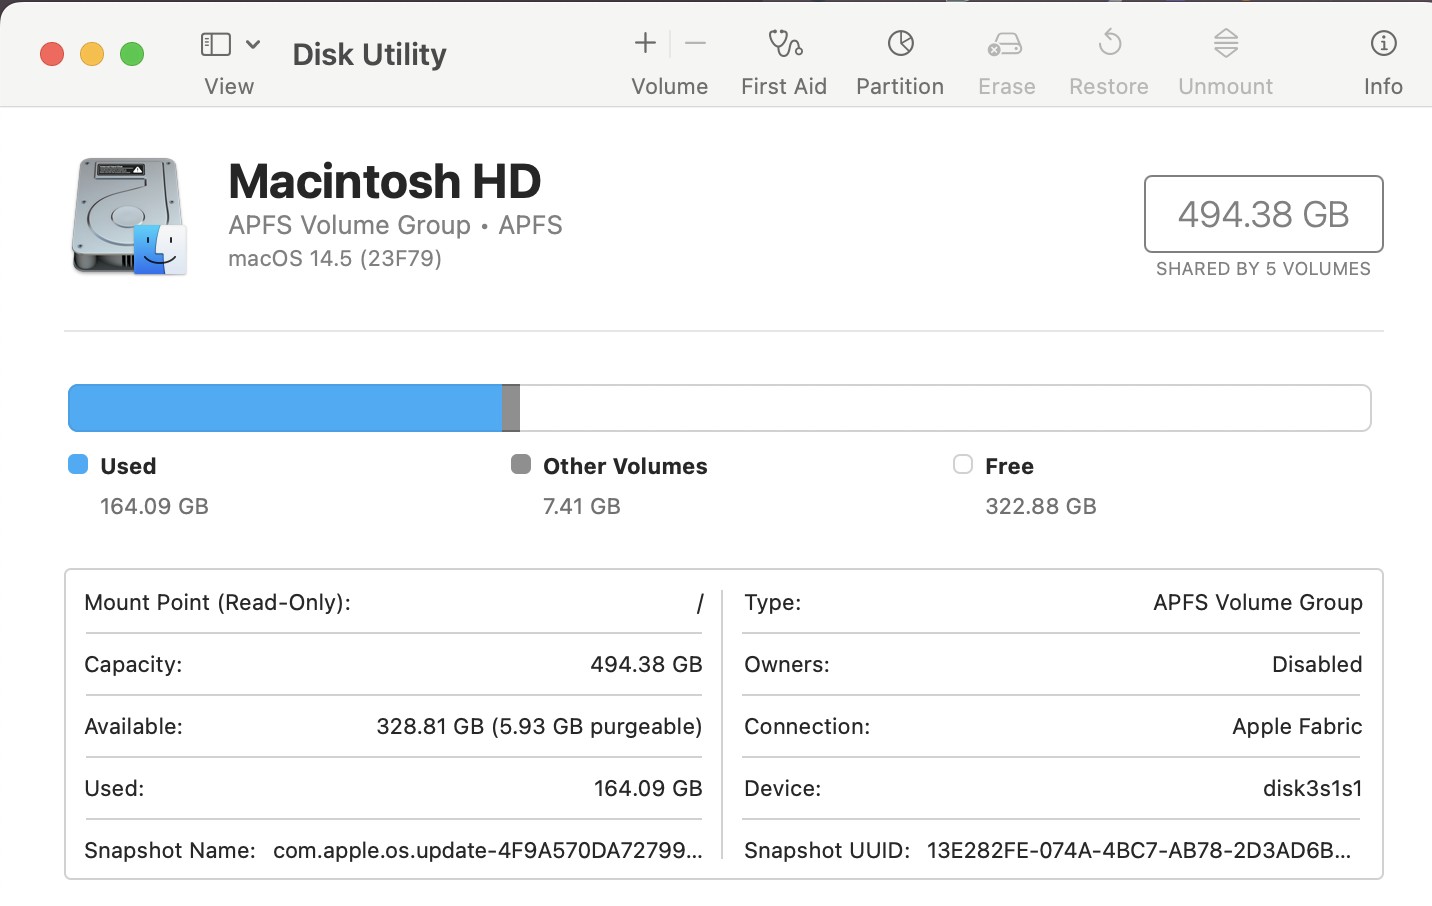
Repair Disk Permissions:
- In Disk Utility, select your Mac’s hard drive from the sidebar (this is usually labeled Macintosh HD ).
- Click the First Aid button at the top of the window.
- Confirm by clicking Run to start the disk check and repair process.
- Disk Utility will now check your drive for any errors and attempt to fix them automatically.
Restart Your Mac:
- Once Disk Utility has finished repairing any issues, restart your Mac.
- Check if the date and time have reappeared in the menu bar.
Running Disk Utility can fix minor disk issues that may be causing system instability, leading to missing elements like the date and time in the menu bar.
Using Diagnostic Tools like Etrecheck
If the previous solutions haven’t resolved the issue, it may be helpful to run a diagnostic tool to identify any underlying problems with your system. One such tool is Etrecheck , a free diagnostic application designed to give you a detailed report of your Mac’s health without making any changes to your system.
What is Etrecheck?
Etrecheck is a powerful tool that scans your Mac’s hardware and software, providing a report that highlights potential issues, such as:
- Performance problems
- Third-party software conflicts
- Malware or unwanted software
- System crashes or disk errors
How to Use Etrecheck to Diagnose Date and Time Issues:
- Go to the official Etrecheck website and download the application.
- Follow the on-screen instructions to install Etrecheck on your Mac.
- Open Etrecheck and choose the option to perform a Basic or Full Scan .
- Wait for the scan to complete, which will take a few minutes.
- Etrecheck will generate a report summarizing any issues found on your Mac.
- Look for problems related to system processes, third-party applications, or disk errors that may explain why the date and time are missing from the menu bar.
- Etrecheck often provides suggestions on how to fix the issues it detects.
- You can manually address any third-party conflicts or performance problems by uninstalling conflicting apps or repairing system files.
Why Use Etrecheck?
Etrecheck is a comprehensive diagnostic tool that doesn’t make changes to your system. It’s particularly useful for identifying software conflicts, third-party apps, or performance issues that are not immediately obvious through basic troubleshooting.
Conclusion
Restoring the date and time to your Mac’s menu bar doesn’t have to be a complicated process. By following these troubleshooting steps—starting with simple settings checks, advancing to safe boot and disk repairs, and using diagnostic tools like Etrecheck—you should be able to resolve the issue. If all else fails, contacting Apple Support ensures you have professional guidance to get your Mac back to normal.
Fix: Mouse Pointer Not Changing to Hand or Text Cursor in macOS
Fix HP Printer Connection Issues After Upgrading to macOS Sonoma
Top 10 Ways to Fix macOS Sonoma Battery Draining Fast Issues
Top 12 Ways to Fix Discord Keeps Restarting on Windows & macOS
Slow Login After macOS Sequoia Update: 9 Ways to Fix it
After updating to macOS Sonoma, many users face problems with HP printers because there are no updated drivers for macOS 14 yet.
If your printer does not support AirPrint or still has issues, try resetting the printer’s settings to clear any old configurations that might be causing problems.
After upgrading to macOS Sonoma, many users have reported issues with their HP printers not working or failing to connect. This is a common problem because HP has not yet released updated drivers compatible with macOS 14, leaving users stuck with non-functional printers. Whether you’re facing issues with printing, scanning, or connecting your HP LaserJet or OfficeJet printer, it can be frustrating to find a solution.
If you’ve been wondering, “Where can I find drivers for HP printers compatible with Sonoma?” , you’re not alone. While there may not be official drivers available for some HP models yet, there are several practical solutions you can try to get your printer back up and running.
How to Fix HP Printer Connection Issues After Upgrading to macOS Sonoma
Let’s dive into the solutions and get your printer up and running smoothly on your new macOS Sonoma!
1. Verify AirPrint Compatibility
One of the simplest ways to avoid driver-related issues with your HP printer after upgrading to macOS Sonoma is to check if your printer supports AirPrint . AirPrint allows you to print wirelessly from your Mac without the need for manufacturer-specific drivers or software. Many newer HP printers come with AirPrint support, which can make the setup process seamless and prevent compatibility problems when the operating system updates.
Why Use AirPrint?
When macOS is updated, some printer manufacturers like HP may not release updated drivers right away, causing printers to stop working. However, if your printer supports AirPrint, it can bypass the need for drivers, allowing you to print directly from your Mac without additional setup.
Steps to Check AirPrint Compatibility:
- Open System Settings: Click the Apple Menu in the top-left corner of your screen and select System Settings .
- Navigate to Printers & Scanners: On the left sidebar, find and click on Printers & Scanners .
- Check for Your Printer: If your printer is not already listed, click the + button to add a new printer.
- Select AirPrint: When your printer shows up in the list, select it. In the Use dropdown menu, check if AirPrint is available as an option. If it is, select AirPrint to set it up.
If AirPrint is Available:
- Your HP printer should work without any additional drivers, and you can start printing right away using macOS Sonoma.
2. Reset Printer Preferences
If your HP printer isn’t working after the macOS Sonoma upgrade and it’s not AirPrint-compatible, resetting your printer preferences is a helpful next step. This can clear any lingering issues caused by outdated drivers or conflicts from the macOS update, allowing you to reconnect your printer as if it were brand new.
Why Reset Printer Preferences?
When you update your Mac’s operating system, it can sometimes cause problems with printer settings. Resetting printer preferences will remove any previous configurations that might be causing issues and help establish a fresh connection between your printer and macOS Sonoma.
- Open System Settings: Click the Apple Menu () in the top-left corner of your screen and choose System Settings .
- Go to Printers & Scanners: In the left-hand sidebar, click on Printers & Scanners .
- Reset Printing System: Right-click (or Control + click) anywhere in the list of printers, and select Reset Printing System from the drop-down menu. A warning will appear asking if you want to reset the printing system. Click Reset to confirm.
- Re-add Your Printer: After the reset, your list of printers will be empty. Click the + button to re-add your HP printer.
- Select Printer from List: Choose your HP printer from the list of available devices and add it. If your printer is connected to the network or via USB, it should appear in the list automatically.
- Install the Correct Driver: If prompted, select the correct driver (if one is available) or opt for the Generic PostScript Printer option, which we will cover in more detail in the next section.
3. Use a Generic PostScript Printer Driver
If resetting your printer preferences didn’t solve the problem and your HP printer isn’t AirPrint-compatible, using a Generic PostScript Printer Driver can be an effective workaround. This option allows you to print basic documents, even if the full range of your printer’s features (like scanning or color printing) isn’t available.
- Open System Settings: Click the Apple Menu and choose System Settings .
- Go to Printers & Scanners: Click on Printers & Scanners in the left-hand sidebar.
- Add a Printer: Click the + button to add a new printer.
- Select Your HP Printer: Your HP printer should appear in the list. Select it.
- Choose a Driver: In the Use dropdown menu, select Generic PostScript Printer . This option allows you to print, although some advanced features like duplex printing or scanning may not be supported.
- Add the Printer: After selecting the driver, click Add to finalize the setup.
4. Download HP Drivers Manually
If using a generic driver doesn’t give you the desired functionality, you can try manually installing older drivers. Many HP printers don’t have updated drivers for macOS Sonoma, but you can often use the drivers for macOS 13 Ventura or earlier. This method can restore full functionality to your printer, including features like color printing and scanning.
- Visit HP’s Support Website: Go to the HP Printer Support Page . Enter your printer model (e.g., HP LaserJet or OfficeJet) in the search box.
- Find the Latest Drivers: HP may only offer drivers for macOS 13 Ventura or older versions. Download the most recent driver available, even if it’s not specifically for macOS 14 Sonoma.
- Install the Drivers: Open the downloaded driver file and follow the installation instructions. Once installed, go to System Settings > Printers & Scanners .
- Add the Printer: Click the + button to add your printer. Your printer should now appear with the installed driver, restoring more advanced functions like scanning and color printing.
Potential Drawback:
You may receive a message like, “This update requires macOS version 13.0 or earlier” when installing the driver, but in many cases, the drivers will still work once installed.
5. Use Pacifist to Force Driver Installation
For more stubborn cases where HP drivers won’t install, you can use Pacifist , a third-party tool, to force drivers to work on macOS Sonoma. Pacifist allows you to open installer packages and manually install specific files, bypassing compatibility issues.
Pacifist is a free app that helps users manage and extract files from installation packages. It can be used to install printer drivers that would otherwise not work with macOS Sonoma, especially for older printers.
- Download Pacifist: Go to Pacifist’s website and download the app.
- Download HP Printer Software: Download the latest HP Printer Software Update from HP’s support page or directly from Apple. If Sonoma drivers are unavailable, download macOS Ventura or Monterey drivers.
- Open the Driver File with Pacifist: Open Pacifist and select Open Package . Navigate to the downloaded HP printer driver package (usually a .pkg file) and open it.
- Install the Drivers: In Pacifist, select HewlettPackardPrinterDrivers.pkg . Click Install at the top of the window to force the installation of the driver.
- Add Your Printer: Once the installation is complete, go to System Settings > Printers & Scanners . Add your printer using the + button.
Note of Caution:
Using Pacifist may not work for every printer model, but it’s a great option for those who are tech-savvy and willing to try additional steps to force drivers to work.
6. Update Printer Firmware
Sometimes, outdated firmware on your printer can cause compatibility issues with macOS updates like Sonoma. Updating your printer’s firmware ensures that it works smoothly with the latest features and security protocols introduced by macOS.
- Go to the HP Support Page .
- Enter your printer model and check for available firmware updates.
- Download the firmware update if available.
- Follow the instructions provided by HP to install the firmware update on your printer.
- After the firmware update, restart both your printer and your Mac.
- Go to System Settings > Printers & Scanners , and re-add your printer if necessary.
7. Reconnect Printer to Wi-Fi and Reset Network Settings
For wireless printers, ensuring your printer and Mac are connected to the same network is crucial. Sometimes, after a macOS update, network settings can get mixed up, causing communication issues between your Mac and printer. Reconnecting your printer to the Wi-Fi network and resetting network settings on your Mac can resolve these issues.
- Go to your printer’s Network Settings (usually through the control panel) and disconnect it from the Wi-Fi.
- Reconnect the printer to the correct Wi-Fi network.
- Go to System Settings > Network > Wi-Fi .
- Click on the i icon next to your current network and choose Forget This Network .
- Reconnect your Mac to the same Wi-Fi network as the printer.
- Go to System Settings > Printers & Scanners .
- Click the + button and add your printer.
8. Use HP Smart App for Easy Setup
If you’re still facing issues after trying other methods, the HP Smart App can simplify the process of setting up and managing your printer. It helps you find your printer on the network and can automatically install necessary drivers and updates.
- Open the Mac App Store and search for HP Smart .
- Download and install the app on your Mac.
- Open the HP Smart App and follow the on-screen prompts to find and connect your HP printer.
- The app will guide you through adding the printer to your network or Mac.
- If necessary, the HP Smart App will prompt you to download and install any missing drivers or firmware updates.
9. Temporary Workaround: Print Using an iPhone or iPad
If you’re unable to get your printer working with macOS Sonoma, using AirPrint on an iPhone or iPad can be a quick and easy workaround to print documents. This method is especially useful for printing from the same network without needing to fully fix the printer issue on your Mac right away.
- On your Mac, save the document you want to print to iCloud Drive or another cloud service accessible from your iPhone or iPad.
- Use the Files app to locate and open the document on your mobile device.
- Tap the Share icon (a square with an arrow pointing up), and select Print .
- Your printer should appear in the list if it’s connected to the same Wi-Fi network.
- Adjust the print settings if needed, and tap Print to send the job to your HP printer.
Conclusion
By following these methods, you should be able to resolve most HP printer connection issues after upgrading to macOS Sonoma. Whether you’re checking for AirPrint compatibility, resetting printer preferences, installing drivers manually, or using tools like Pacifist and HP Smart App, there are multiple ways to get your printer up and running again. If all else fails, using AirPrint from an iPhone or iPad can be a handy temporary workaround.
- External Hard Drives SSD Keeps Disconnecting macOS Sonoma, but Accessible on iPhone
- WallpaperVideoExtension High RAM and CPU Usage in macOS
- Slow Login After macOS Sequoia Update: 9 Ways to Fix it
- Top 10 Ways to Fix macOS Sonoma Battery Draining Fast Issues
- Top 10 Ways to Fix macOS Error Code 10000
