- Apple AirTag is a popular device offering location tracking until the battery drains, but it can present issues if not updating its location, often due to being out of range or having a dead battery.
- Common fixes include finding the AirTag, unpairing and repairing it with your iPhone, toggling airplane mode, resetting the AirTag, checking the battery, and contacting Apple Support if issues persist.
- Resetting the AirTag and replacing the battery can resolve location tracking problems, ensuring the device functions properly for locating lost items.
Apple AirTag is one of the most purchased devices from Apple. This is because of the functionality it offers. It guarantees that you won’t lose anything until the battery is completely drained. However, when you buy your new Apple AirTag and notice that it is not updating its location, it can be quite a headache.
If you are also facing the same issue with your AirTag, you don’t need to worry. The issue is more common than it sounds. Here, in this guide, we will go through several ways to fix if Apple Airtag is not updating its location and also discuss its reasons.

Why is Apple AirTag Not Updating Its Location?
Apple AirTap may fail to update its location if it is out of range. Another thing that can possibly stop Apple AirTag from updating its location is its battery. If the battery is completely drained, the location won’t be updated. Let alone location, it won’t even make a beep sound.
Other than this, there cannot be more issues. However, it is possible that your AirTag has been submersed in water and is now out of order, but that is quite rare. Anyway, things may lose potential over time and AirTag is no different. If you think your AirTag is new enough and it is the first time you are seeing this issue, this guide can help you immensely.
How to Fix When Apple AirTag Not Updating Its Location?
If Apple AirTag is not updating its location, there are plenty of things you can try. However, make sure that you go through this guide serially so that you don’t miss anything.
Fix 1: Find Your AirTag

The best way to start fixing your Apple AirTag when it is not updating location is to find it. While it may be a hard task, but you can do it. Unfortunately, if you are not able to find it, you won’t be able to fix it.
Usually, Apple AirTag, when it is not able to update its location, it may give out an error like AirTag not reachable, move around to reconnect . If that’s the case with you, too, make sure to check out our guide.
Fix 2: Unpair and Repair the AirTag
Now that you have found your AirTag and it is in your hand, you can unpair and Re-pair it again with your iPhone. This process makes sure that your AirTag is able to update its locations by clearing all the cache. Here are the steps to do it:
- On your iPhone, open the Find My app.
- Now, switch to the Items tab from the bottom.
- Tap on your AirTag .
- Swipe up to view the settings.
- Tap on Remove Item.
- Tap on Confirm to approve your selection.
- Once done, pair it again.
That’s it. Now keep your AirTag far from you and check whether it is able to update its location or not. If not, move on to the next fix.
Fix 3: AirTag Is Out of Range
The most common issue why AirTag is not updating is location is because it is out of range. The Apple AirTag uses Bluetooth to send your GPS signals and help you find your product chained with it. However, because the range of Bluetooth is limited to 10 Meters or 30 Feet, if your AirTag goes any farther, your AirTag would fail to update its location until you get close enough.
A simple walkaround for this would be to move around and check if it updates the location. When your AirTag is able to communicate with your iPhone through Bluetooth, the location will be updated, and your AirTag will start working again. However, if that’s not the case, move to the next fix.
Fix 5: Toggle the Airplane Mode
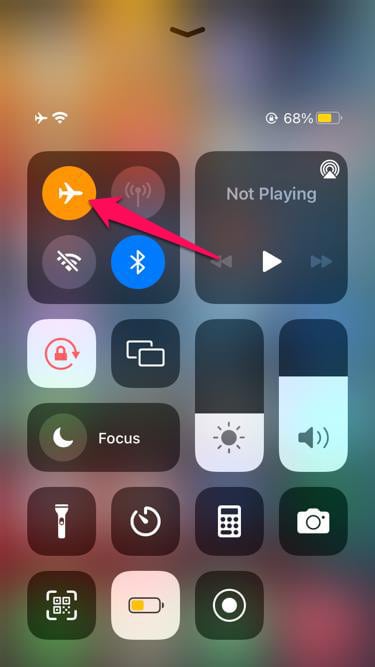
Sometimes, all you need is to toggle the Airplane mode to on and then off. This process is a old confirmed technique that fixes AirTag issues. Along with that, it fixes associated network issues, if any. We have covered about this in updating cell towers in an iPhone .
However, make sure that you don’t toggle it quickly. Turn on Airplane mode and then wait for a few minutes to turn it off again. Once done, you can then restart your device and check whether Apple AirTag is updating its location or not.
Fix 6: Reset the AirTag

Now that you have found your AirTag, the next step is to reset it. Resetting the AirTag will fix almost every issue you are facing with it right now. However, if you don’t know how to reset it, here are the steps:
- On your AirTag, you will notice a small shiny button.
- Press and hold that key for 5 seconds until you see a Red light flashing.
- Now, wait for 2 seconds, and then press and hold it again.
This process will reset the AirTag. Once the AirTag is reset, try connecting to it again and check whether it is able to update its location or not.
Fix 7: Check For AirTag Battery

Sometimes, the main reason behind AirTag not updating its location is a dead battery. The average battery life of an AirTag is 1 year and if used regularly, it can last from 6 to 8 months. If you think that time has passed, it would be wise enough to replace the battery and check for location activity. If you don’t know how to change the battery, follow these steps:
- On your AirTag, there’s a tiny white button that you use to Pair it with your iPhone.
- Turn your AirTag upside down to see the shiny metallic part.
- Press and twist it anticlockwise, and that cover will come out.
- Now, buy a new CR2032 battery and replace it by matching the correct polarity.
Once you replace the battery, it will be turned on by default. You don’t need to do anything. Check whether it is able to update its location or not.
Fix 8: Contact Apple Support
Even after following all steps, if your AirTag is still not updating its location, there might be an internal issue. In contrast, contacting Apple Customer support is wise as well as silly at the same time.
Since the AirTag costs around $29, it is best that you purchase a new one, thinking that this one is destroyed or has reached the end of its life. On the other hand, if you make this work, make sure to visit contact Apple customer support .
The Bottom Line
Well, that’s all we have here about how you can fix if Apple AirTag is not updating its location. If you still have any doubts or queries, make sure to comment below, and we will try to help.
7 Ways to Fix Apple AirTag Not Connecting or Pairing
AutoFill Email/SMS Verification Codes on iPhone with iOS 17
Top 5 Ways to Fix Onn TV Won’t Turn On
Fix System_Application_Force_Next_0007 Error
How To Fix MangaOwl Down Or Not Working
How To Fix Android Auto Split Screen Not Working
System_Application_Force_Next_0007 error is causing issues on Windows PC, disrupting workflow and application launches.
Causes include outdated Windows version, drivers, virus/malware, corrupted files, conflicting software, system changes, bugs, and glitches.
Troubleshooting steps include restarting the PC, updating Windows, running SFC scan, running DISM scan, scanning for viruses, reinstalling problematic applications, performing system restore, and resetting the PC as a last resort.
System_Application_Force_Next_0007 is a system error encountered by users recently on their Windows PC . If you are facing this issue, then that means there is something wrong with the application or Windows. This error message may interrupt your workflow, prevent you from launching the application, or cause issues like system crashes and lags. We will guide you with the troubleshooting steps to help fix the System_Application_Force_Next_0007 Error.
What Are The Causes Of System_Application_Force_Next_0007 Error?
If you are facing the System_Application_Force_Next_0007 error on your PC, then it can be due to the following reasons-
- This issue can be encountered when you are running an older version of Windows on your PC. Simply put, you can encounter this issue when you have a pending Windows update.
- Another reason for facing this issue is the outdated PC drivers .
- You can also face the issue if the virus /malware has infected your system.
- Corrupted system files can also cause this issue on Windows PC.
- Conflicting software on your PC is another reason that can cause this issue.
- You might also face this issue due to bugs and temporary glitches on your system.
- Another common reason that can be causing this issue is system changes. It can be anything from changing the system settings to updating the Windows that can lead to this issue.

Ways To Fix System_Application_Force_Next_0007 Error
There can be multiple reasons behind facing the System_Application_Force_Next_0007 error. Given below are the steps you can follow to fix this issue-
Restart PC
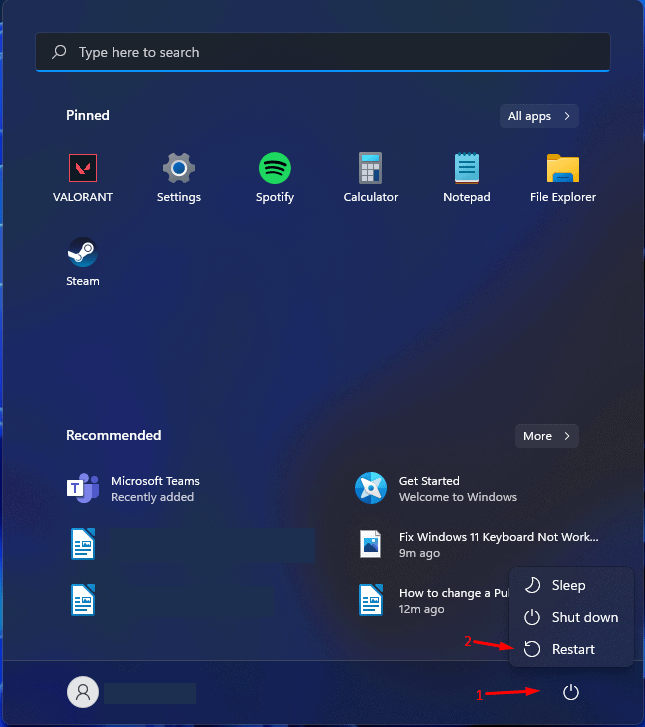
Before starting with the other troubleshooting steps listed in this article, try restarting your PC. If the System_Application_Force_Next_0007 error is being caused due to bugs and technical glitches, then a simple restart should help fix the issue. However, if you still encounter the issue after the restart, try the next step mentioned in this article.
Update Windows
This error can be encountered due to a pending Windows update . Updating your Windows to the latest version should help fix it. The steps given below should help you update Windows to the latest version-
- Press Windows + I key combo to open the Settings app.
- Click on the Windows Update option on the left sidebar.
- Click Check for Updates on the right side to scan for updates.

- Once all the updates are listed, download and install them.
Not only will this update the Windows, but it will also update the drivers on your PC.
Run SFC Scan
SFC can be used to scan for corrupted files and fix them. If the issue is caused due to corrupted files, then running the SFC scan should fix the issue. Here’s how you can run the SFC scan on your PC-
- Press the Windows key on your keyboard and type CMD .
- Select Command Prompt from the Start Menu and click Run As Administrators .

- You can now run the SFC scan by executing the command given below in the Command Prompt- sfc /scannow

- Wait till the process finishes, and then restart your PC.
Run DISM Scan
If running the SFC scan didn’t turn out to be useful, then you will have to run the DISM scan on your system. Given below are the steps to do it-
- Press Windows + R key combo to open the Run Dialog Box .
- Type CMD and press Ctrl + Shift + Esc to run the Command Prompt with administrative privileges.

- Now, execute the following commands one by one- DISM /Online /Cleanup-Image /CheckHealth DISM /Online /Cleanup-Image /ScanHealth DISM /Online /Cleanup-Image /RestoreHealth
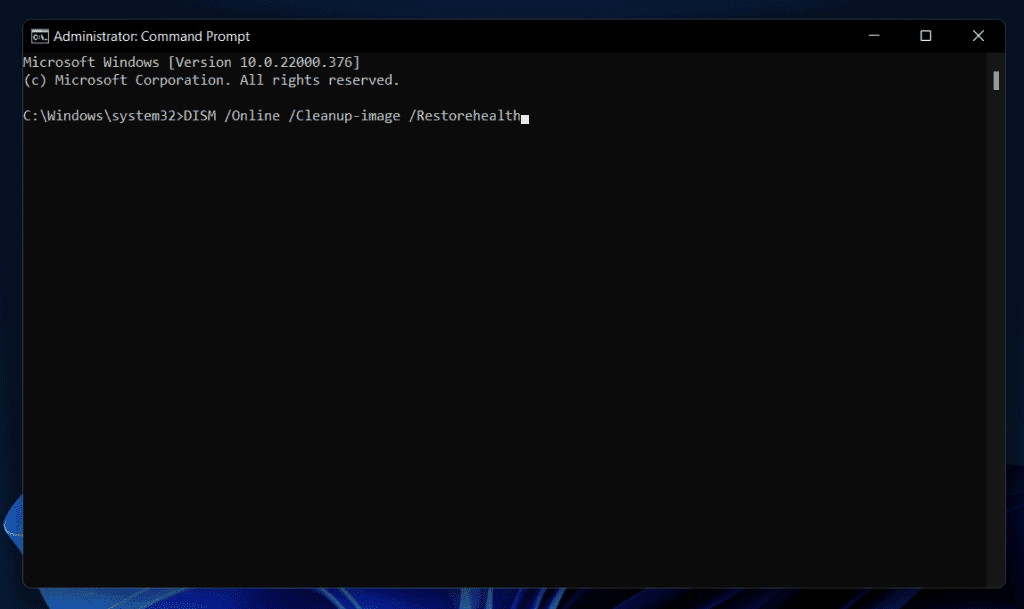
- Once you are done with the above commands, restart your PC.
Scan Your PC For Virus
You can also encounter the System_Application_Force_Next_0007 error due to the virus/malware infection on your PC. If you use any third-party antivirus, you will have to use it to scan your PC for viruses. If you don’t have any third-party antivirus, then run Windows Security scan-
- Click the Start icon at the bottom taskbar to open the Start Menu .
- In the Start Menu , type Windows Security and press Enter to open it.

- On the main screen on Windows Security, click on Virus & threat protection option.

- Here, click on Scan Options .

- From all the options you see here, select Full Scan and then click the Scan Now button.

- This will run the Windows Security scan and fix all the issues caused due to viruses.
Reinstall Application With The Issue
If you are facing this issue with a particular application or after installing an application, then probably that’s the cause of the issue. Reinstall the application you think is causing the issue and see if the error is still encountered. You can do this by following the steps given below-
- Open the Run Dialog Box through the Windows + R keyboard shortcut.
- In the Run Dialog Box, type Control and click on OK .

- Under the Programs section, click on Uninstall a program option.

- You will see all the software that is installed on your PC.
- Click on the software that is causing the issue, and click on Uninstall .

- Click on Uninstall again to confirm uninstalling the application and follow the on-screen instructions.
- Once the software is installed, restart your PC to clear the residual files.
- Now, run the setup again and install the application on your PC.
Perform System Restore
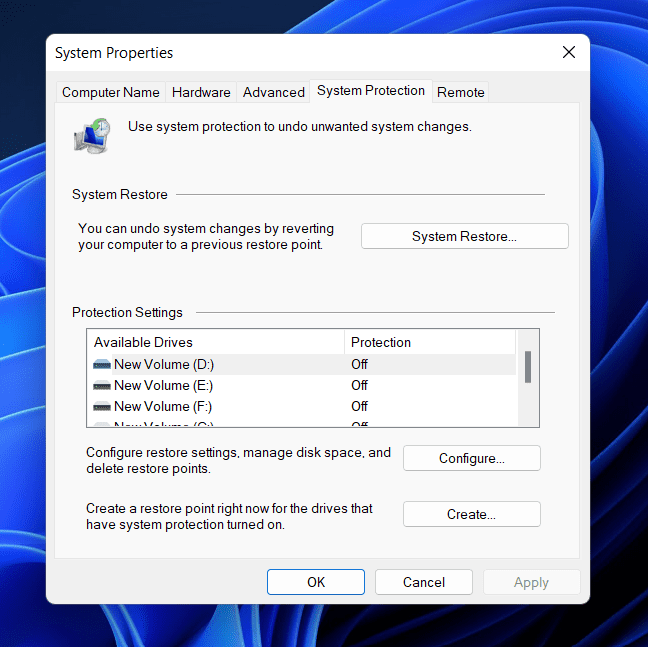
If you started facing the System_Application_Force_Next_0007 error after making some changes to your PC, like installing an update, updating the drivers, reinstalling the drivers, etc, then you should try performing a system restore. When you perform a system restore, your PC will be reverted to a certain time, and all the changes that you did will be undone.
To continue with this method, you must have a restore point created before the change to the system is made. You can follow our guide to perform system restoration on Windows . After performing the system restore, all the applications you installed and the changes after the restore point was created will be undone. You should now no longer face this issue on your PC.
Reset Your PC
If you have followed all the above steps and are still facing this issue, you must reset your PC. This is the last resort you should continue with, and you should only reset your PC if you have tried all the methods mentioned in this article. Before you go ahead resetting your PC, take a backup of everything on your PC. Factory reset will clear out all the settings, remove apps, and delete all the data, so it is important to have a backup of your data. You can follow our guide to factory reset your Windows PC .
Bottom Line
The issue should be solved now. If you have followed the above steps correctly, you shouldn’t face the System_Application_Force_Next_0007 error. If the issue is still encountered, you should try contacting your device’s customer support or Microsoft customer support .
- Top 10 Ways to Fix Winword.exe Application Error on Windows 11/10
- 9 Quick Ways to Get Help in Windows 10 and Windows 11
- How To Sign Out Other Users Out On Windows 11
- Windows 11 Installation Stuck? Here’s How to Fix
- Repair Windows 11 Using 4 Methods | Step-by-Step Guide
- 5 Ways to Change System Language Settings on Windows 11
- Change Default Search To Google in Start Menu Windows 11
